I/O代表着输入(Input)和输出(Output),具体指从外部读取数据到内存中或者从内存中输出数据到外部。这里的“外部”可以是硬盘、磁带等本地存储介质,也可以是网络连接的远程设备。
输入和输出是以内存为中心而言的一个相对概念。毕竟对于一个最简单的计算机结构而言,内存和CPU是不可或缺的,我们的程序就是运行在内存中的,而其它的东西都是非必要的。所以虽然硬盘是存在于电脑内部的,但对于内存而言,依然是一个“外部存储器”。所以从硬盘读取数据到内存这个过程就称作输入(Input),而从内存读取数据到硬盘就称作输出(Output)。
Java中的I/O相关的类相当复杂,这和Java的历史包袱有关,也和其开发团队的设计有关。在介绍相关的类之前,我们先了解一个与文件直接相关的类File。
File类
Java中的File类可以用于读取目录信息:
package ch17.file;
import java.io.File;
public class Main {
public static void main(String[] args) {
File file = new File(".");
String[] paths = file.list();
for (String path : paths) {
System.out.println(path);
}
}
}
// .git
// .gitignore
// .vscode
// ch0
// exception.log
// exp.log
// LICENSE
// README.md
// test.txt
// xyz
实际上
File类可以用于表示一个目录或文件,准确的说,其表示的是一个操作系统文件系统路径,FilePath是一个更合理的名称。
list方法可以接受一个FilenameFilter接口,用以按照目录或文件名进行筛选,并输出结果:
package ch17.file2;

import java.io.File;
import java.io.FilenameFilter;
import java.util.regex.Pattern;

public class Main {
    public static void main(String[] args) {
        File file = new File(".");
        final String regex = ".*\\.log";
        String[] paths = file.list(new FilenameFilter() {
            private Pattern pattern = Pattern.compile(regex);

            @Override
            public boolean accept(File dir, String name) {
                return pattern.matcher(name).matches();
            }

        });
        for (String path : paths) {
            System.out.println(path);
        }
    }
}
// exception.log
// exp.log
这里使用正则表达式对子目录/文件进行筛选,正则表达式在中介绍过。
list返回的子目录/文件信息是以字符串数组形式组成的,这种内容并不容易再次利用,我们往往需要获取到File对象,以进一步处理。因此,File类的listFiles方法更有用,它可以返回由File对象组成的数组。
package ch17.file3;

import java.io.File;
import java.io.FilenameFilter;
import java.util.regex.Pattern;

public class Main {
    public static void main(String[] args) {
        File file = new File(".");
        final String regex = ".*\\.log";
        File[] paths = file.listFiles(new FilenameFilter() {
            private Pattern pattern = Pattern.compile(regex);

            @Override
            public boolean accept(File dir, String name) {
                return pattern.matcher(name).matches();
            }

        });
        for (File path : paths) {
            System.out.println(path);
        }
    }
}
// .\exception.log
// .\exp.log
事实上,可以使用File获取更多的信息:
...
public class Main {
    public static void main(String[] args) {
		...
        for (File path : paths) {
            System.out.println("================================");
            printFileInfo(path);
        }
    }

    private static void printFileInfo(File file) {
        Fmt.printf("name:%s\n", file.getName());
        boolean isFile = file.isFile();
        String type = isFile ? "file" : "dir";
        Fmt.printf("type:%s\n", type);
        Fmt.printf("abs path:%s\n", file.getAbsolutePath());
        try {
            Fmt.printf("canonical path:%s\n", file.getCanonicalPath());
        } catch (IOException e) {
            throw new RuntimeException(e);
        }
        Fmt.printf("parent:%s\n", file.getParentFile().getAbsolutePath());
        long lastModified = file.lastModified();
        Fmt.printf("last modified:%s\n", date2Str(lastModified));
        boolean canRead = file.canRead();
        Fmt.printf("can read:%s\n", canRead);
    }

    private static String date2Str(long date) {
        SimpleDateFormat sdf = new SimpleDateFormat("yyyy-MM-dd hh:mm:ss");
        return sdf.format(new Date(date));
    }
}
// ================================
// name:exception.log
// type:file
// abs path:D:\workspace\java\java-notebook\.\exception.log
// canonical path:D:\workspace\java\java-notebook\exception.log
// parent:D:\workspace\java\java-notebook\.
// last modified:2022-01-24 03:55:55
// can read:true
// ================================
// name:exp.log
// type:file
// abs path:D:\workspace\java\java-notebook\.\exp.log
// canonical path:D:\workspace\java\java-notebook\exp.log
// parent:D:\workspace\java\java-notebook\.
// last modified:2022-01-24 04:30:34
// can read:true
这个示例说明了可以通过File获取文件或目录的大部分信息,包含:名称、种类、绝对路径、规范路径、父目录、最后修改时间、RWX权限等。
目录遍历
遍历目录是一个常见操作,这里编写了一个可以遍历目录,并生成目录结构的类:
package ch17.directory;

import java.io.File;
import java.io.FilenameFilter;
import java.util.Iterator;
import java.util.LinkedList;
import java.util.List;
import java.util.NoSuchElementException;
import java.util.regex.Pattern;

class Directory implements Iterable<File> {
    private List<File> files = new LinkedList<>();
    private List<Directory> dirs = new LinkedList<>();
    private File root;
    private int deep = 0;
    private String regex;
    private static String DEFAULT_REGEX = ".*";

    public Directory(String path) {
        this(path, DEFAULT_REGEX);
    }

    public Directory(File path) {
        this(path, DEFAULT_REGEX);
    }

    public Directory(String path, String regex) {
        root = new File(path);
        this.regex = regex;
        init();
    }

    public Directory(File path, String regex) {
        root = path;
        this.regex = regex;
        init();
    }

    private void init() {
        FilenameFilter ff = new FilenameFilter() {
            Pattern p = Pattern.compile(regex);

            @Override
            public boolean accept(File dir, String name) {
                String currentFileStr = dir.getAbsolutePath() + "\\" + name;
                File currentFile = new File(currentFileStr);
                if (currentFile.isDirectory()) {
                    return true;
                }
                return p.matcher(name).matches();
            }

        };
        for (File file : root.listFiles(ff)) {
            if (file.isFile()) {
                files.add(file);
            } else {
                Directory subDir = new Directory(file, regex);
                subDir.deep = deep + 1;
                dirs.add(subDir);
            }
        }
    }

    private void addPrefix(StringBuffer sb) {
        for (int i = 0; i < deep; i++) {
            sb.append("\t");
        }
    }

    @Override
    public String toString() {
        StringBuffer sb = new StringBuffer();
        addPrefix(sb);
        sb.append(root.getName());
        sb.append("\n");
        for (File file : files) {
            addPrefix(sb);
            sb.append("|-------");
            sb.append(file.getName());
            sb.append("\n");
        }
        for (Directory dir : dirs) {
            sb.append(dir.toString());
        }
        return sb.toString();
    }

    @Override
    public Iterator<File> iterator() {
        return new Iterator<File>() {
            private Iterator<File> filesIterator = files.iterator();
            private int dirIndex = 0;

            @Override
            public boolean hasNext() {
                if (filesIterator.hasNext()) {
                    return true;
                } else {
                    if (dirIndex >= dirs.size()) {
                        return false;
                    }
                    filesIterator = dirs.get(dirIndex++).iterator();
                    return hasNext();
                }
            }

            @Override
            public File next() {
                File file;
                try {
                    file = filesIterator.next();
                } catch (NoSuchElementException e) {
                    if (dirIndex >= dirs.size()) {
                        return null;
                    }
                    filesIterator = dirs.get(dirIndex++).iterator();
                    return next();
                }
                return file;
            }

        };
    }

}

public class Main {
    public static void main(String[] args) {
        Directory dir = new Directory("D:\\workspace\\java\\java-notebook\\ch0", ".*\\.java");
        System.out.println(dir);
        for (File file : dir) {
            System.out.println(file);
        }
    }
}
实用工具
除了遍历目录以外,使用File类还可以完成对文件的删除、重命名等,下面是我用此类功能编写的一个对当前目录下文件进行管理的小工具:
package ch17.file_opt;

import java.io.File;
import java.io.FilenameFilter;
import java.util.Arrays;
import java.util.regex.Pattern;

import util.Fmt;

public class Main {
    public static void main(String[] args) {
        if (args.length == 0) {
            System.out.println("File operation help:");
            System.out.println("command options [files]");
            System.out.println("options:");
            System.out.println("-l [regex] print current directorie's files.");
            System.out.println("-d file1 [file2 file3 ...] delete files.");
            System.out.println("-r old_name new_name renmae file.");
        } else if (args.length == 1 && args[0].equals("-l")) {
            printFiles(".*");
        } else if (args.length == 2 && args[0].equals("-l")) {
            printFiles(args[1]);
        } else if (args.length >= 2 && args[0].equals("-d")) {
            String[] fileNames = Arrays.copyOfRange(args, 1, args.length);
            removeFile(fileNames);
        } else if (args.length == 3 && args[0].equals("-r")) {
            rename(args[1], args[2]);
        }
    }

    private static void printFiles(final String regex) {
        File file = new File(".");
        int counter = 0;
        FilenameFilter ff = new FilenameFilter() {
            Pattern pattern = Pattern.compile(regex);

            @Override
            public boolean accept(File dir, String name) {
                if (pattern.matcher(name).matches()) {
                    return true;
                }
                return false;
            }

        };
        for (File subFile : file.listFiles(ff)) {
            if (subFile.isFile()) {
                System.out.println(subFile.getName());
                counter++;
            }
        }
        Fmt.printf("total %d files.\n", counter);
    }

    private static void removeFile(String... fileNames) {
        int success = 0;
        int fail = 0;
        for (String fileName : fileNames) {
            File file = new File(fileName);
            if (file.delete()) {
                Fmt.printf("The file %s is deleted.", fileName);
                success++;
            } else {
                fail++;
            }
        }
        Fmt.printf("delete operation is done, %d success, %d fail.", success, fail);
    }

    private static void rename(String oldName, String newName) {
        File file = new File(oldName);
        if(file.renameTo(new File(newName))){
            Fmt.printf("The file %s is renamed to %s.", oldName, newName);
        }
        else{
            System.out.println("rename operation is failed.");
        }
    }

}
可以在命令行下执行该程序,不带参数时会输出帮助信息:
❯ java -cp D:\workspace\java\java-notebook\xyz\icexmoon\java_notes ch17.file_opt.Main
Picked up JAVA_TOOL_OPTIONS: -Dfile.encoding=UTF-8
File operation help:
command options [files]
options:
-l [regex] print current directorie's files.
-d file1 [file2 file3 ...] delete files.
-r old_name new_name renmae file.
-l参数可以打印出当前目录下的文件名,并可以指定一个正则表达式进行筛选:
❯ java -cp D:\workspace\java\java-notebook\xyz\icexmoon\java_notes ch17.file_opt.Main -l .*\.mp3
Picked up JAVA_TOOL_OPTIONS: -Dfile.encoding=UTF-8
0. 22秒.mp3
0. 海之彼岸.mp3
moves-like-jagger.mp3
sugar.mp3
乡恋(央视2013中秋晚会)-李谷一.mp3
云水禅心(古筝独奏)-王珣.mp3
云水禅心-玉琳琅.mp3
国色天香加长版7737b7ba8a8.mp3
当爱离别时.mp3
桥边姑娘-小倩.mp3
桥边姑娘.mp3
梨花颂.mp3
梨花飞情人泪2.mp3
total 13 files.
-d参数可以删除指定文件:
❯ java -cp D:\workspace\java\java-notebook\xyz\icexmoon\java_notes ch17.file_opt.Main -d 乡恋.mp3
Picked up JAVA_TOOL_OPTIONS: -Dfile.encoding=UTF-8
The file 乡恋.mp3 is deleted.delete operation is done, 1 success, 0 fail.
-r参数可以重命名文件:
❯ java -cp D:\workspace\java\java-notebook\xyz\icexmoon\java_notes ch17.file_opt.Main -r 梨花飞情人泪2.mp3 梨花飞情人泪.mp3
Picked up JAVA_TOOL_OPTIONS: -Dfile.encoding=UTF-8
The file 梨花飞情人泪2.mp3 is renamed to 梨花飞情人泪.mp3.
这个工具可以看做是Linux系统上rm和ls等工具的集合。
rm、ls等shell命令可以通过管道命令结合更多命令使用,所以在实用性上要强得多。
IO流
Java将输入和输出的数据当做“流”看待,也就是一个可以持续产生数据的东西,统称为IO流。
IO流具体被设计为标准类库java.io中的相关类簇,可以用下面的思维导图表示:
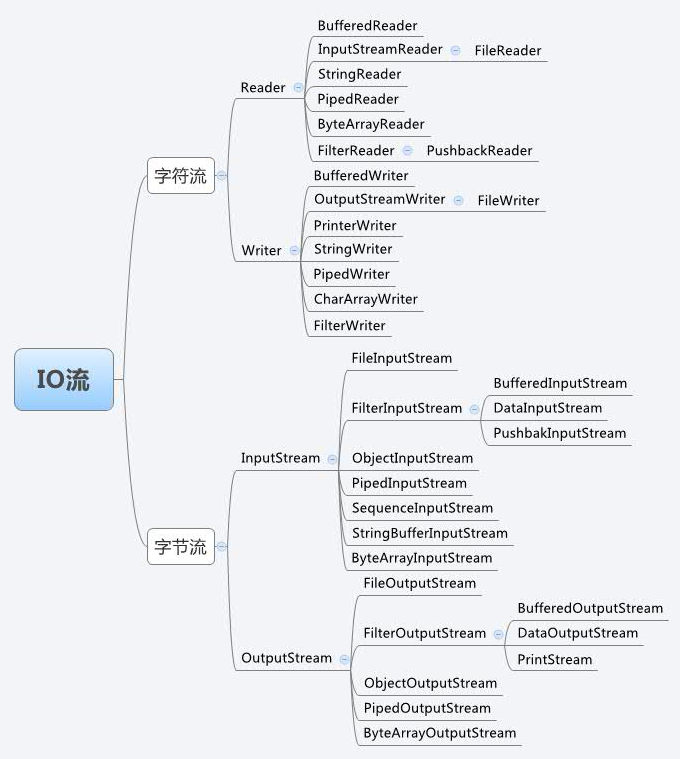
图源:
IO流主要分为字节流和字符流,这实际上这是历史原因产生的。
我们知道计算机系统中的所有数据其实本质上都是以字节方式存储的,换句话说Java最初实现的字节流相关类库就可以解决所有的输入输出问题,但如果你用字节流的方式来处理文本文档,就需要你添加编码和解码的逻辑,也就要将字符转换为字节,或者将字节转换为字符。
这是相当麻烦和不必要的,所以Java的开发团队在之后的版本中加入了字符流的相关类库,它们可以直接输入或输出字符形式的内容,编码或转码的工作会由相关的类自行完成。
此外,IO流的另一大特点是将功能拆分的很细,比如FileOutputStream表示一个输出到文件的OutputStream,但该IO流不具备缓冲功能,所以性能不佳,而BufferedOutputStream表示一个具备缓冲能力的OutputStream,所以我们可以将这两者结合起来,让写入数据到文件时使用缓冲,这可以提升性能。而为了让BufferedOutputStream这些特殊的OutputStream类可以很容易地和其它OutputStream结合,Java设计了一个类FilterOutputStream,该类实际上是一个OutputStream的“装饰器”类,自然继承于它的BufferedOutputStream等类可以是装饰器类,所以可以很容易地与其它OutputStream结合,类似的装饰器类还有FilterInputStream等。
有时候我们还需要将字节流转换为字符流使用,这时候InputStreamReader和OutputStreamReader就很有用,从这两个类的名字就可以看出端倪,实际上这是两个“适配器”类,它们可以将字节流转换为字符流,也就是可以帮我们完成相应的编码和解码工作。
我用EA绘制了主要IO流相关的类和接口的类图,该类图对理解整个IO流类和接口的关系很有帮助:
-
。
字节流
下面是一个使用字节流写入文件和读取文件的示例:
package ch17.byte_stream;

import java.io.BufferedInputStream;
import java.io.BufferedOutputStream;
import java.io.DataInputStream;
import java.io.DataOutputStream;
import java.io.File;
import java.io.FileInputStream;
import java.io.FileOutputStream;
import java.io.IOException;

public class Main {
    public static void main(String[] args) throws IOException {
        final String currentDir = "./xyz/icexmoon/java_notes/ch17/byte_stream/";
        DataOutputStream dos = new DataOutputStream(
                new BufferedOutputStream(
                        new FileOutputStream(new File(currentDir + "data.out"))));
        dos.writeInt(999);
        dos.writeUTF("你好!");
        dos.close();
        DataInputStream dis = new DataInputStream(
                new BufferedInputStream(new FileInputStream(currentDir + "data.out")));
        int num = dis.readInt();
        String msg = dis.readUTF();
        System.out.println(num);
        System.out.println(msg);
        dis.close();
    }
}
// 999
// 你好!
就像示例中展示的那样,使用Java IO时,通常会将多个IO类组合使用,就像实例中的:
new DataOutputStream(
                new BufferedOutputStream(
                        new FileOutputStream(new File(currentDir + "data.out"))));
最外层是一个DataOutputStream,它可以用于写入多种类型的数据到字节流,BufferedOutputStream的用途是让包含的输出流具备缓冲区,这样有利于大量写入数据时的性能提升。最内侧的FileOutputStream就是一个指向文件的输出流,利用它可以将数据输出到文件。
此外,DataOutputStream可以直接写入所有基础类型的数据,比如writeInt、writeDouble等等,也可以写入String,对应的方法是writeUTF,之所以不叫writeString,是因为通过该方法写入的字符串是以UTF编码的方式写入到字节流中的,也就是说可以支持中文,就像示例中展示的那样。
还需要注意的一点是,IO类通常都具备多个重载的构造方法,创建时具备相当的灵活性,就像示例中FileInputStream就没有包含一个File对象,而是直接使用了一个表示文件路径的字符串,这样同样是可以的。
如果你使用文本编辑器打开
data.out文件,可能会看到一些乱码,这是理所当然的,通过字节流产生的文件往往是非文本文件,只能通过二进制文件查看器来查看。
字符流
下面是一个使用字符流写入和读取文件的简单示例:
package ch17.cha_stream;

import java.io.BufferedReader;
import java.io.BufferedWriter;
import java.io.File;
import java.io.FileReader;
import java.io.FileWriter;
import java.io.IOException;

public class Main {
    public static void main(String[] args) throws IOException {
        final String CURRENT_DIR = "./xyz/icexmoon/java_notes/ch17/cha_stream/";
        final String FILE_NAME = "char.out";
        BufferedWriter bw = new BufferedWriter(new FileWriter(new File(CURRENT_DIR + FILE_NAME)));
        bw.write("Hellow world!\n");
        bw.write("How are you!\n");
        bw.write("Bye~~\n");
        bw.close();
        BufferedReader br = new BufferedReader(new FileReader(CURRENT_DIR + FILE_NAME));
        String line;
        while ((line = br.readLine()) != null) {
            System.out.println(line);
        }
        br.close();
    }
}
// Hellow world!
// How are you!
// Bye~~
使用的方式与字节流类似,这里不多做赘述。
如果用文本编辑器打开
char.out文件,会发现可以正常显示,这是因为这里使用的是字符流。
前边提到过,实际上所有文件都是以二进制位载体的,也就是说如果我们清楚二进制文件中的数据是如何“组织”(编码)的,那我们完全可以还原出原本的数据,下面这个例子说明了这一点:
package ch17.cha_stream2;

import java.io.BufferedInputStream;
import java.io.BufferedOutputStream;
import java.io.DataOutputStream;
import java.io.File;
import java.io.FileInputStream;
import java.io.FileOutputStream;
import java.io.IOException;

import util.BytesConvert;

public class Main {
    public static void main(String[] args) throws IOException {
        final String CURRENT_DIR = "./xyz/icexmoon/java_notes/ch17/cha_stream2/";
        final String FILE_NAME = "data.out";
        DataOutputStream dos = new DataOutputStream(
                new BufferedOutputStream(
                        new FileOutputStream(new File(CURRENT_DIR + FILE_NAME))));
        dos.writeInt(999);
        dos.writeUTF("你好!我来了。");
        dos.writeUTF("再见!我走了。");
        dos.writeInt(666);
        dos.close();
        final String FILE_ENCODING = System.getProperty("file.encoding");
        System.out.println(FILE_ENCODING);
        BufferedInputStream bis = new BufferedInputStream(new FileInputStream(CURRENT_DIR + FILE_NAME));
        byte[] b = new byte[bis.available()];
        bis.read(b);
        bis.close();
        int index = 0;
        int num = BytesConvert.convertBytesToInt(b, index);
        System.out.println(num);
        index += Integer.BYTES;
        String msg = BytesConvert.getUTFStr(b, index, FILE_ENCODING);
        System.out.println(msg);
        index += BytesConvert.getUTFLen(b, index) + 2;
        msg = BytesConvert.getUTFStr(b, index, FILE_ENCODING);
        System.out.println(msg);
        index += BytesConvert.getUTFLen(b, index) + 2;
        num = BytesConvert.convertBytesToInt(b, index);
        System.out.println(num);
        index += Integer.BYTES;
    }
}
// 999
// 你好!我来了。
// 再见!我走了。
// 666
这个例子中,依然使用DataOutputStream写入一个整型和一个字符串到二进制文件中,而读取文件的时候则是直接使用BufferedInputStream读取到一个字节数组中,我们知道在Java中,一个整型由4个字节构成,所以这里将前4个字节转换为二进制形式,然后利用Integer.parseInt方法获取相应的十进制整数。
必须使用
Byte.toUnsignedInt将单个字节转换为无符号整型后再转换为二进制字符串,不能直接使用(int)b的方式,否则会出错。
其后还原字符串内容必须先获取文件的编码格式,如果你不确定是什么,可以尝试获取系统默认的文件编码格式,具体方式是System.getProperty("file.encoding")。然后就可以利用编码格式将字节数组转换为解码后的UTF字符串:String msg = new String(msgBytes, FILE_ENCODING)。当然这里的字节数组是已经排除掉整形内容的子序列。
需要注意的是,为了能在读取时获取编码后的字符串的长度,在写入时Java会在字符串前加上两个字节作为长度标识。相应的,我们可以通过读取这个长度标识来获取编码后的字符串长度,然后来进行解码。
上面示例中对字节数组的转换和解码工作都是由一个我编写的工具类BytesConvert来负责:
package util;

import java.io.UnsupportedEncodingException;
import java.util.Arrays;

/**
 * 将字节或字节数组转换为特定类型的工具类
 */
public class BytesConvert {
      /**
     * 从字节数组的指定位置开始读取UTF-8字符串,长度由Java写入时添加的标记确定
     *
     * @param b        字节数组
     * @param off      起始下标
     * @param encoding 编码
     * @return
     * @throws UnsupportedEncodingException
     */
    public static String getUTFStr(byte[] b, int off, String encoding) throws UnsupportedEncodingException {
        int len = getUTFLen(b, off);
        int begin = off + 2;
        byte[] msgBytes = Arrays.copyOfRange(b, begin, begin + len);
        String msg = new String(msgBytes, encoding);
        return msg;
    }

    /**
     * 根据字节数组指定位置,查找下一个UTF字符串长度
     * @param b
     * @param off
     * @return 下一个字符串的字节数
     */
    public static int getUTFLen(byte[] b, int off) {
        // Java使用两个字节标记UTF字符串长度
        String strLen = convertByteToBinaryStr(b[off]) + convertByteToBinaryStr(b[off + 1]);
        return Integer.parseInt(strLen, 2);
    }

    /**
     * 从给定字节数组的特定位置,获取一个整数值并返回
     * @param b
     * @param off
     * @return
     */
    public static int convertBytesToInt(byte[] b, int off) {
        StringBuffer sb = new StringBuffer();
        // 一个int占4字节
        for (int i = off; i < off + Integer.BYTES; i++) {
            sb.append(convertByteToBinaryStr(b[i]));
        }
        int num = Integer.parseInt(sb.toString(), 2);
        return num;
    }

    /**
     * 将给定的字节转换为二进制形式的字符串
     * @param b
     * @return
     */
    public static String convertByteToBinaryStr(byte b) {
        String binaryStr = Integer.toBinaryString(Byte.toUnsignedInt(b));
        binaryStr = String.format("%8s", binaryStr).replace(" ", "0");
        return binaryStr;
    }
}
这个类的内容并不复杂,并且我添加了注释,所以不做过多说明。
需要说明的是,上面这个例子主要是为了解释“如何通过原始的方式从二进制内容中还原数据”,显然这种方式是复杂和容易出错的,只应当作为一种练习。在正常情况下还是应当使用标准库封装好的DataInputStream。
RandomAccessFile
有一个类很奇怪:RandomAccessFile。这个类游离于字节流和字符流之外,它并没有继承任何一个IO类,只不过实现了三个IO相关的接口:DataInput、DataOutput、Closeable。
这个类可以看做是一种便捷地操作二进制文件的工具:
package ch17.access_file;

import java.io.EOFException;
import java.io.IOException;
import java.io.RandomAccessFile;

public class Main {
    public static void main(String[] args) throws IOException {
        final String CURRENT_DIR = "./xyz/icexmoon/java_notes/ch17/access_file/";
        final String FILE_NAME = "data.out";
        RandomAccessFile raf = new RandomAccessFile(CURRENT_DIR + FILE_NAME, "rw");
        for (int i = 0; i < 7; i++) {
            raf.writeInt(i);
        }
        raf.close();
        printFile(CURRENT_DIR + FILE_NAME);
        raf = new RandomAccessFile(CURRENT_DIR + FILE_NAME, "rw");
        raf.seek(3 * Integer.BYTES);
        raf.writeInt(999);
        raf.close();
        printFile(CURRENT_DIR + FILE_NAME);
    }

    private static void printFile(String fileName) throws IOException {
        RandomAccessFile raf = new RandomAccessFile(fileName, "r");
        System.out.println("file contents:");
        do {
            int num = 0;
            try {
                num = raf.readInt();
            } catch (EOFException e) {
                break;
            }
            System.out.print(num + ", ");
        } while (true);
        raf.close();
        System.out.println();
    }
}
// file contents:
// 0, 1, 2, 3, 4, 5, 6,
// file contents:
// 0, 1, 2, 999, 4, 5, 6,
RandomAccessFile有一个方法seek,可以修改其内部的游标(文件指针),我们可以通过控制这个游标的位置来直接修改特定位置的内容,就像示例中做的那样。不过这样做的前提条件是要完全清楚目标二进制文件的格式。
快捷方式
通过前边的介绍,应该已经对Java的IO类有一个直观的认识了,可以看到,这种设计的问题之一是类的数量很庞大,即使是一个简单的从文件读取文本的工作,也需要结合多个类使用。为此,标准库提供了一些“快捷方式”。
首先要介绍的是FileReader,如果查看类图就会发现这个类有点奇怪,它是继承自InputStreamReader,前边已经介绍过,这个类实际上是一个适配器。
对此,API文档有提到:FileReader本身包含一个默认的byte-buffer以及字符编码,如果你需要自行指定或设置缓冲,就需要自行使用FileInputStream和InputStreamReader。
所以可以猜测之所以FileReader继承InputStreamReader,就是要利用其构造函数来包含一个默认的FileInputStream,源码也证实了这一点:
    public FileReader(String fileName) throws FileNotFoundException {
        super(new FileInputStream(fileName));
    }
下面是一个使用FileReader的示例:
package ch17.file_reader;

import java.io.FileReader;
import java.io.IOException;

public class Main {
    public static void main(String[] args) throws IOException {
        final String CURRENT_DIR = "./xyz/icexmoon/java_notes/ch17/file_reader/";
        final String FILE_NAME = "Main.java";
        final String FILE_PATH = CURRENT_DIR + FILE_NAME;
        FileReader fr = new FileReader(FILE_PATH);
        do {
            char[] buff = new char[255];
            int num = fr.read(buff);
            if (num == -1) {
                break;
            }
            for (int i = 0; i < num; i++) {
                System.out.print(buff[i]);
            }
        } while (true);
        fr.close();
    }
}
如果不使用FileReader,可能需要这样做:
package ch17.file_reader2;

import java.io.FileInputStream;
import java.io.IOException;
import java.io.InputStreamReader;

public class Main {
    public static void main(String[] args) throws IOException {
        final String CURRENT_DIR = "./xyz/icexmoon/java_notes/ch17/file_reader2/";
        final String FILE_NAME = "Main.java";
        final String FILE_PATH = CURRENT_DIR + FILE_NAME;
        InputStreamReader isr = new InputStreamReader(new FileInputStream(FILE_PATH), "UTF8");
        do {
            char[] buff = new char[255];
            int num = isr.read(buff);
            if (num == -1) {
                break;
            }
            for (int i = 0; i < num; i++) {
                System.out.print(buff[i]);
            }
        } while (true);
        isr.close();
    }
}
与之类似的还有一个PrintWriter类,这个类的用途是支持“格式化打印”,也就是用格式化符号输出特定字符串。如果用传统方式使用该类打印数据到文件,可能会这么编写代码:
package ch17.print_writer;

import java.io.BufferedReader;
import java.io.BufferedWriter;
import java.io.FileReader;
import java.io.FileWriter;
import java.io.IOException;
import java.io.PrintWriter;

public class Main {
    public static void main(String[] args) throws IOException {
        final String CURRENT_DIR = "./xyz/icexmoon/java_notes/ch17/print_writer/";
        final String SOURCE_FILE = CURRENT_DIR + "Main.java";
        final String DES_FILE = CURRENT_DIR + "out.data";
        BufferedReader br = new BufferedReader(new FileReader(SOURCE_FILE));
        PrintWriter pw = new PrintWriter(new BufferedWriter(new FileWriter(DES_FILE)));
        try {
            do {
                String line = br.readLine();
                if (line == null) {
                    break;
                }
                pw.println(line);
            } while (true);
        } finally {
            br.close();
            pw.close();
        }
    }
}
如果执行这个示例,就会发现在同目录下出现了一个和Main.java内容完全相同的out.data文件。
需要注意的是,br.readLine方法获取到的数据会自动去除结尾的换行符,所以写入数据时需要调用pw.println以添加上结尾的换行符。此外,这里用try...finally包裹了读取和写入数据的部分,并在finally块中添加了关闭输入流和输出流的语句,这是为了能在数据读取或写入出错时也能正常关闭流。当然这并非必须,Java虚拟机会确保程序退出时关闭所有已打开的资源,但这种显式关闭资源的方式在任何编程语言中都是一种良好习惯。
除了上面展示的这种“一般性写法”,PrintWriter还提供一种重载的构造方法,可以更简单地通过文件或文件名来创建并打印内容到文件中:
...
public class Main {
    public static void main(String[] args) throws IOException {
        final String CURRENT_DIR = "./xyz/icexmoon/java_notes/ch17/print_writer2/";
        final String SOURCE_FILE = CURRENT_DIR + "Main.java";
        final String DES_FILE = CURRENT_DIR + "out.data";
        BufferedReader br = new BufferedReader(new FileReader(SOURCE_FILE));
        PrintWriter pw = new PrintWriter(DES_FILE);
        ...
    }
}
如果查看这个构造函数的源码,就会发现它是这样构造的:
    ...
    public PrintWriter(String fileName) throws FileNotFoundException {
        this(new BufferedWriter(new OutputStreamWriter(new FileOutputStream(fileName))),
             false);
    }
    ...
实用工具
虽然IO流的这种设计提供了相当高的灵活性,但对于大多数时候我们读写一些小容量的文本文件或者二进制文件会产生很大不便。为此,可以编写一些简单的工具类:
package util;

import java.io.BufferedReader;
import java.io.FileNotFoundException;
import java.io.FileReader;
import java.io.IOException;
import java.io.PrintWriter;
import java.util.Arrays;
import java.util.Iterator;
import java.util.LinkedList;
import java.util.List;

public class TextFile implements Iterable<String> {
    private List<String> lines = new LinkedList<>();

    public TextFile(String fileName, String sepRegex) {
        String content = read(fileName);
        lines.addAll(Arrays.asList(content.split(sepRegex)));
    }

    public TextFile(String fileName) {
        this(fileName, "\n");
    }

    public void write(String fileName) {
        try {
            PrintWriter pw = new PrintWriter(fileName);
            try {
                for (String line : lines) {
                    pw.println(line);
                }
            } finally {
                pw.close();
            }
        } catch (IOException e) {
            throw new RuntimeException(e);
        }
    }

    public static String read(String fileName) {
        try {
            BufferedReader br = new BufferedReader(new FileReader(fileName));
            StringBuilder sb = new StringBuilder();
            try {
                do {
                    String line = br.readLine();
                    if (line == null) {
                        break;
                    }
                    sb.append(line);
                    sb.append("\n");
                } while (true);
            } finally {
                br.close();
            }
            return sb.toString();
        } catch (IOException e) {
            throw new RuntimeException(e);
        }
    }

    public static void write(String fileName, String content) {
        PrintWriter pw;
        try {
            pw = new PrintWriter(fileName);
        } catch (FileNotFoundException e) {
            throw new RuntimeException(e);
        }
        try {
            pw.print(content);
        } finally {
            pw.close();
        }
    }

    @Override
    public Iterator<String> iterator() {
        return lines.iterator();
    }

    public static void main(String[] args) {
        final String CURRENT_DIR = "./xyz/icexmoon/java_notes/util/";
        final String DES_FILE = CURRENT_DIR + "data.out";
        final String SOURCE_FILE = CURRENT_DIR + "TextFile.java";
        TextFile tf = new TextFile(SOURCE_FILE);
        tf.write(DES_FILE);
        TextFile tf2 = new TextFile(DES_FILE);
        for (String line : tf2) {
            System.out.println(line);
        }
    }
}
这个类不仅提供了从文本文件获取全部内容的字符串和将字符串写入文本文件的方法,还可以用换行符或者指定正则切割文件内容,并进行遍历或者写入指定文件。
类似的,同样可以编写一个简化的读写二进制文件的工具类:
package util;

import java.io.BufferedInputStream;
import java.io.BufferedOutputStream;
import java.io.FileInputStream;
import java.io.FileOutputStream;
import java.io.IOException;

public class BinaryFile {
    /**
     * 以字节方式读取文件内容并返回
     *
     * @param fileName 文件名
     * @return 字节数组
     */
    public static byte[] read(String fileName) {
        try {
            BufferedInputStream bis = new BufferedInputStream(new FileInputStream(fileName));
            byte[] b = new byte[bis.available()];
            try {
                bis.read(b);
                return b;
            } finally {
                bis.close();
            }
        } catch (IOException e) {
            throw new RuntimeException(e);
        }
    }

    public static void write(String fileName, byte[] b) {
        try {
            BufferedOutputStream br = new BufferedOutputStream(new FileOutputStream(fileName));
            try {
                br.write(b);
            } finally {
                br.close();
            }
        } catch (IOException e) {
            throw new RuntimeException(e);
        }
    }
}
最后要强调的是,这种方式只能用于目标文件容量不大的情况,否则全部读取到内存中可能占用大量内存,甚至撑爆内存。如果是那样的情况就需要考虑利用视图或文件映射等功能部分读取文件内容而非一次性读取全部。
标准IO
很多编程语言或操作系统都有标准IO的概念,包含三种类型:
-
stdin:标准输入,指键盘。
-
stdout:标准输出,指屏幕。
-
stderr:标准错误,指屏幕。
Java中同样有标准IO,对应System.in、System.out和System.err:
package ch17.stdio;

public class Main {
    public static void main(String[] args) {
        System.out.println(System.in.getClass().getSimpleName());
        System.out.println(System.out.getClass().getSimpleName());
        System.out.println(System.err.getClass().getSimpleName());
    }
}
// BufferedInputStream
// PrintStream
// PrintStream
这个示例说明System.in的类型是BufferedInputStream,而System.out和System.err的类型是PrintStream。
虽然
System.in的真实类型是BufferedInputStream,但句柄System.in的类型其实是InputStream。
System.in
因为System.in属于字节流,所以在通过它们读取字符串时,我们需要将其转换为字符流,下面是一个从标准输入读取内容并写入标准输出的示例:
package ch17.stdio2;

import java.io.BufferedReader;
import java.io.IOException;
import java.io.InputStreamReader;

public class Main {
    public static void main(String[] args) throws IOException {
        BufferedReader br = new BufferedReader(new InputStreamReader(System.in));
        do {
            String line = br.readLine();
            if (line == null || line.length() == 0) {
                break;
            }
            String uppedLine = line.toUpperCase();
            System.out.println(uppedLine);
        } while (true);
    }
}
这个示例可以通过控制台读取一行输入字符串,并将其转换为大写形式后输出(空行退出程序)。
System.out
虽然System.out和System.err同样属于字节流,但因为PrintStream的println和print方法经过重载,支持对多种类型数据的输出,其中也包括String,所以一般情况下我们可以直接使用System.out输出字符串,但如果有需要,依然可以将其包装为字符流后使用:
package ch17.stdio3;

import java.io.BufferedReader;
import java.io.IOException;
import java.io.InputStreamReader;
import java.io.PrintWriter;

public class Main {
    public static void main(String[] args) throws IOException {
        BufferedReader br = new BufferedReader(new InputStreamReader(System.in));
        PrintWriter pw = new PrintWriter(System.out);
        do {
            String line = br.readLine();
            if (line == null || line.length() == 0) {
                break;
            }
            String uppedLine = line.toUpperCase();
            pw.println(uppedLine);
            pw.flush();
        } while (true);
    }
}
因为这里是将内容输出到标准输出,所以我们并不希望在输出完毕后关闭标准输出,这就意味着编译器同样不会在关闭输出流时帮我们将写入的内容刷新到输出流中。
因此这里每次执行pw.println语句后都会调用pw.flush将内容刷新到输出流。
你可能会疑惑为什么平时使用System.out.println时并不需要这样做,那是因为标准输出使用了“自动刷新”,也就是说调用其print或println方法时,会自动调用flush方法进行刷新。事实上当我们用一个支持自动刷新的OutputStream构造PrintWriter时,同样可以让PrintWriter启用自动刷新:
package ch17.stdio4;

import java.io.BufferedReader;
import java.io.IOException;
import java.io.InputStreamReader;
import java.io.PrintWriter;

public class Main {
    public static void main(String[] args) throws IOException {
        BufferedReader br = new BufferedReader(new InputStreamReader(System.in));
        PrintWriter pw = new PrintWriter(System.out, true);
        do {
            String line = br.readLine();
            if (line == null || line.length() == 0) {
                break;
            }
            String uppedLine = line.toUpperCase();
            pw.println(uppedLine);
        } while (true);
    }
}
PrintWriter构造函数的第二个参数表示开启自动刷新。
重定向
System提供一系列方法,允许我们将标准流进行重定向:
package ch17.stdio5;

import java.io.BufferedInputStream;
import java.io.BufferedReader;
import java.io.FileInputStream;
import java.io.IOException;
import java.io.InputStream;
import java.io.InputStreamReader;
import java.io.PrintStream;

public class Main {
    public static void main(String[] args) throws IOException {
        final String CURRENT_DIR = "./xyz/icexmoon/java_notes/ch17/stdio5/";
        final String FILE = CURRENT_DIR + "Main.java";
        final String DES_FILE = CURRENT_DIR + "data.out";
        InputStream stdin = System.in;
        PrintStream stdout = System.out;
        BufferedInputStream bis = new BufferedInputStream(new FileInputStream(FILE));
        System.setIn(bis);
        PrintStream ps = new PrintStream(DES_FILE);
        System.setOut(ps);
        try {
            copyInput2Output(System.in, System.out);
        } finally {
            bis.close();
            ps.close();
        }
        System.setIn(stdin);
        System.setOut(stdout);
    }

    private static void copyInput2Output(InputStream in, PrintStream out) throws IOException {
        BufferedReader br = new BufferedReader(new InputStreamReader(in));
        do {
            String line = br.readLine();
            if (null == line) {
                break;
            }
            out.println(line);
        } while (true);
    }
}
在这个示例中,先将标准输入和标准输出重定向到从文件输入和输出到一个新文件,然后从标准输入逐行读取,并输出到标准输出,其结果就是将文件Main.java逐行输出到文件data.out。
要注意的是,一般情况下我们都需要在重定向标准IO,并执行完需要的操作后将标准IO“还原”,因此我们往往需要在重定向前保存原始的标准IO句柄,并在结束业务逻辑后充值标准IO。
此外,这个示例仅为了说明如何对标准IO进行重定向,重定向本身并没有太大意义,copyInput2Output方法可以直接接受文件输入或文件输出流作为参数。
执行命令行
很多编程语言都支持直接在程序中执行系统的命令行,在这种情况下我们同样需要用程序的方式来获取其执行结果,进一步判断执行成功还是失败,并在需要的时候输出。
同样的,我们可以创建一个相关的工具类:
package util;

import java.io.BufferedReader;
import java.io.IOException;
import java.io.InputStream;
import java.io.InputStreamReader;

public class CommandLine {
    public static void exec(String command) {
        try {
            Process process = new ProcessBuilder(command.split(" ")).start();
            InputStream processOut = process.getInputStream();
            InputStream processErr = process.getErrorStream();
            BufferedReader outBr = new BufferedReader(new InputStreamReader(processOut));
            BufferedReader errBr = new BufferedReader(new InputStreamReader(processErr));
            System.out.println("execute result:");
            do {
                String line = outBr.readLine();
                if (null == line) {
                    break;
                }
                System.out.println(line);
            } while (true);
            boolean hasErr = false;
            System.out.println("execute error:");
            do {
                String line = errBr.readLine();
                if (line == null) {
                    break;
                }
                hasErr = true;
                System.err.println(line);
            } while (true);
            if (hasErr) {
                throw new ExecuteException(command);
            }
        } catch (IOException e) {
            throw new RuntimeException(e);
        }
    }

    public static class ExecuteException extends RuntimeException {
        public ExecuteException(String command) {
            super(command);
        }
    }

    public static void main(String[] args) {
        exec("java --version");
    }
}
具体执行命令行的任务由ProcessBuilder创建,并通过start方法来执行。
执行的结果通过Process.getInputStream获取,可能的错误信息由Process.getErrorStream获取。
这里再次强调,输入和输出是也给相对概念,所以这里虽然是命令行执行结果的正常输出和错误输出,但对于当前程序来说,这些都算是输入,所以方法名称是
getInputStream,返回的也是InputStream类型。
对于正常的执行结果,我们直接输出到标准输出,如果存在错误信息,我们通过标准错误输出,并抛出一个内嵌的异常类ExecuteException表示执行出错,以供客户端程序进行捕获处理。
新IO
JDK1.4引入了一个新的IO类库java.nio,相比于java.io,该类库的读写性能更好。实际上旧的java.io类库也经过了重构,充分利用了java.nio,因此即使依然在程序中使用的是java.io,也可以享受新类库带来的性能提升。
新IO主要引入了通道和缓冲这两个概念,可以将其类比为公路和货车。因为这种方式更接近于操作系统底层的数据读写方式,所以性能较好。
java.io中的FileInputStream、FileOutputStream、RandomAccessFile经过了重构,可以获取一个代表通道的FileChannel对象,利用该对象和代表缓冲的ByteBuffer对象可以完成数据的读取和写入:
package ch17.nio;

import java.io.FileInputStream;
import java.io.FileOutputStream;
import java.io.IOException;
import java.io.RandomAccessFile;
import java.nio.ByteBuffer;
import java.nio.channels.FileChannel;

public class Main {
    public static void main(String[] args) throws IOException {
        final String CURRENT_DIR = "./xyz/icexmoon/java_notes/ch17/nio/";
        final String FILE = CURRENT_DIR + "data.out";
        FileOutputStream fos = new FileOutputStream(FILE);
        FileChannel fc = fos.getChannel();
        fc.write(ByteBuffer.wrap("Hello world!\n".getBytes()));
        fc.close();
        fos.close();
        RandomAccessFile raf = new RandomAccessFile(FILE, "rw");
        fc = raf.getChannel();
        fc.position(fc.size());
        fc.write(ByteBuffer.wrap("How are you.\n".getBytes()));
        fc.close();
        raf.close();
        FileInputStream fis = new FileInputStream(FILE);
        fc = fis.getChannel();
        ByteBuffer bf = ByteBuffer.allocate(1024);
        fc.read(bf);
        bf.flip();
        while (bf.hasRemaining()) {
            System.out.print((char) bf.get());
        }
        fc.close();
        fis.close();
    }
}
// Hello world!
// How are you.
可以通过两种方式产生ByteBuffer:
-
通过
ByteBuffer.wrap方法指定一个字节数组作为ByteBuffer的底层数组,利用这种方法可以直接用一个现成的字符串来构建ByteBuffer。 -
通过
ByteBuffer.allocate(1024)创建一个指定容量的ByteBuffer。
此外,在从通道读取数据到缓冲之后,从缓冲中读取数据之前,需要调用ByteBuffer.flip,该方法的用途是调整ByteBuffer中的尾部游标到实际数据的尾部,这样才能让之后的数据读取正常进行。
之后的循环遍历时可以通过hasRemaining方法检测ByteBuffer中是否还有数据没有读取,调用get方法可以读取单个字节。
还需要注意的是,可以通过FileChannel的position方法修改游标的位置,利用该方法可以在通道尾部写入数据。
下面再看一个利用新IO编写的复制文件的示例:
package ch17.nio2;

import java.io.FileInputStream;
import java.io.FileOutputStream;
import java.io.IOException;
import java.nio.ByteBuffer;
import java.nio.channels.FileChannel;

public class Main {
    public static void main(String[] args) throws IOException {
        final String CURRENT_DIR = "./xyz/icexmoon/java_notes/ch17/nio2/";
        final String SOURCE_FILE = CURRENT_DIR + "Main.java";
        final String DES_FILE = CURRENT_DIR + "data.out";
        copyFile(SOURCE_FILE, DES_FILE);
    }

    private static void copyFile(String source, String des) throws IOException {
        FileInputStream fis = new FileInputStream(source);
        FileOutputStream fos = new FileOutputStream(des);
        FileChannel fcIn = fis.getChannel();
        FileChannel fcOut = fos.getChannel();
        ByteBuffer bb = ByteBuffer.allocate(1024);
        do {
            if (fcIn.read(bb) == -1) {
                break;
            }
            bb.flip();
            fcOut.write(bb);
            bb.clear();
        } while (true);
        fcIn.close();
        fcOut.close();
        fis.close();
        fos.close();
    }
}
这里分别获取了原文件和目标文件的通道,并用一个大小为1k的缓冲从源文件读取,并向目标文件写入。需要注意的是,每次向目标文件写入后,在下次使用缓冲从源文件读取数据前,需要调用clear方法将ByteBuffer中的数据清空,该方法同样会重置其中的所有游标。只有这样才能再次正常向ByteBuffer中写入数据,否则会被脏数据或以改变的游标影响。
这样做并不是最简单的,因为通道可以直接连接:
package ch17.nio3;

import java.io.FileInputStream;
import java.io.FileOutputStream;
import java.io.IOException;
import java.nio.channels.FileChannel;

public class Main {
    public static void main(String[] args) throws IOException {
        final String CURRENT_DIR = "./xyz/icexmoon/java_notes/ch17/nio3/";
        final String SOURCE_FILE = CURRENT_DIR + "Main.java";
        final String DES_FILE = CURRENT_DIR + "data.out";
        copyFile(SOURCE_FILE, DES_FILE);
    }

    private static void copyFile(String source, String des) throws IOException {
        FileInputStream fis = new FileInputStream(source);
        FileOutputStream fos = new FileOutputStream(des);
        FileChannel fcIn = fis.getChannel();
        FileChannel fcOut = fos.getChannel();
        // fcOut.transferFrom(fcIn, 0, fcIn.size());
        fcIn.transferTo(0, fcIn.size(), fcOut);
        fcIn.close();
        fcOut.close();
        fis.close();
        fos.close();
    }
}
示例中展示了通过FileChannel的transferFrom或transferTo方法连接通道,连接后自然会将原通道的指定数目的字节写入目标通道。
编码
前边我们利用通道和缓冲写入并读取字符串时,是利用read读取单个字节,并直接转换为char的方式,事实上ByteBuffer有一个asCharBuffer的方法,可以获取一个对应的字符缓冲,使用该缓冲的toString方法就可以直接打印字符串:
package ch17.encode;

import java.io.FileInputStream;
import java.io.FileOutputStream;
import java.io.IOException;
import java.nio.ByteBuffer;
import java.nio.channels.FileChannel;

public class Main {
    public static void main(String[] args) throws IOException {
        final String CURRENT_DIR = "./xyz/icexmoon/java_notes/ch17/encode/";
        final String FILE = CURRENT_DIR + "data.out";
        FileOutputStream fos = new FileOutputStream(FILE);
        FileChannel outChannel = fos.getChannel();
        outChannel.write(ByteBuffer.wrap("Hello world!".getBytes()));
        fos.close();
        outChannel.close();
        FileInputStream fis = new FileInputStream(FILE);
        FileChannel inChannel = fis.getChannel();
        ByteBuffer bb = ByteBuffer.allocate(255);
        inChannel.read(bb);
        bb.flip();
        System.out.println(bb.asCharBuffer());
        fis.close();
        inChannel.close();
    }
}
// ?汬漠睯牬搡
奇怪的是按这种方式输出的是一串乱码,这是因为我们写入二进制内容时的编码与读取二进制内容时的解码使用了不同的字符集导致的,更简单的说法是编码方式不一致。
事实上String.getBytes方法会使用操作系统默认的编码格式进行编码,也就是System.getProperty("file.encoding")返回的字符集,我这里是UTF-8。而asCharBuffer用于解码的字符集是UTF-16BE。
解决方法很简单,只要将编码和解码方式统一即可,具体的方式可以是多种多样的。
方案一,用UTF-16BE作为编码写入数据:
package ch17.encode2;

import java.io.FileInputStream;
import java.io.FileOutputStream;
import java.io.IOException;
import java.nio.ByteBuffer;
import java.nio.channels.FileChannel;

public class Main {
    public static void main(String[] args) throws IOException {
        final String CURRENT_DIR = "./xyz/icexmoon/java_notes/ch17/encode2/";
        final String FILE = CURRENT_DIR + "data.out";
        FileOutputStream fos = new FileOutputStream(FILE);
        FileChannel outChannel = fos.getChannel();
        outChannel.write(ByteBuffer.wrap("Hello world!".getBytes("UTF-16BE")));
        fos.close();
        outChannel.close();
        FileInputStream fis = new FileInputStream(FILE);
        FileChannel inChannel = fis.getChannel();
        ByteBuffer bb = ByteBuffer.allocate(255);
        inChannel.read(bb);
        bb.flip();
        System.out.println(bb.asCharBuffer());
        fis.close();
        inChannel.close();
    }
}
// Hello world!
方案二:使用操作系统默认字符集进行解码:
package ch17.encode3;

import java.io.FileInputStream;
import java.io.FileOutputStream;
import java.io.IOException;
import java.nio.ByteBuffer;
import java.nio.channels.FileChannel;
import java.nio.charset.Charset;

public class Main {
    public static void main(String[] args) throws IOException {
        final String CURRENT_DIR = "./xyz/icexmoon/java_notes/ch17/encode3/";
        final String FILE = CURRENT_DIR + "data.out";
        FileOutputStream fos = new FileOutputStream(FILE);
        FileChannel outChannel = fos.getChannel();
        outChannel.write(ByteBuffer.wrap("Hello world!".getBytes()));
        fos.close();
        outChannel.close();
        FileInputStream fis = new FileInputStream(FILE);
        FileChannel inChannel = fis.getChannel();
        ByteBuffer bb = ByteBuffer.allocate(255);
        inChannel.read(bb);
        bb.flip();
        final String charsetName = System.getProperty("file.encoding");
        Charset charset =  Charset.forName(charsetName);
        System.out.println(charset.decode(bb));
        fis.close();
        inChannel.close();
    }
}
// Hello world!
Charset是java.nio包中代表字符集的类,可以用forName方法获取相应的字符集对象,然后调用decode进行解码。
方案三:使用CharBuffer写入和读取数据:
package ch17.encode4;

import java.io.FileInputStream;
import java.io.FileOutputStream;
import java.io.IOException;
import java.nio.ByteBuffer;
import java.nio.CharBuffer;
import java.nio.channels.FileChannel;

public class Main {
    public static void main(String[] args) throws IOException {
        final String CURRENT_DIR = "./xyz/icexmoon/java_notes/ch17/encode4/";
        final String FILE = CURRENT_DIR + "data.out";
        FileOutputStream fos = new FileOutputStream(FILE);
        FileChannel outChannel = fos.getChannel();
        ByteBuffer bb = ByteBuffer.allocate(255);
        CharBuffer cb = bb.asCharBuffer();
        cb.put("Hello world!");
        outChannel.write(bb);
        fos.close();
        outChannel.close();
        FileInputStream fis = new FileInputStream(FILE);
        FileChannel inChannel = fis.getChannel();
        bb.clear();
        inChannel.read(bb);
        bb.flip();
        System.out.println(bb.asCharBuffer());
        fis.close();
        inChannel.close();
    }
}
// Hello world!
主要注意的是,在执行完cb.put之后,不能执行bb.flip方法,否则无法写入数据到文件。
此外,以这种方式写入的数据,无法被文本编辑器正常查看,大概是使用了某种Java特定的编码?
前面已经介绍了CharSet的用法,这里通过一个简单示例打印系统支持的编码:
package ch17.encode5;

import java.nio.charset.Charset;
import java.util.Map;
import java.util.SortedMap;

public class Main {
    public static void main(String[] args) {
        SortedMap<String, Charset> charSets = Charset.availableCharsets();
        for (Map.Entry<String, Charset> entry : charSets.entrySet()) {
            System.out.println(entry.getKey() + ":");
            for (String aliaseName : entry.getValue().aliases()) {
                System.out.print(aliaseName + ", ");
            }
            System.out.println();
        }
    }
}
// x-MS932_0213:
// MS932:2004, windows-932:2004, MS932_0213, MS932-0213, windows-932-0213,
// x-MS950-HKSCS:
// MS950_HKSCS,
// x-MS950-HKSCS-XP:
// MS950_HKSCS_XP,
// x-mswin-936:
// ms936, ms_936,
Charset.availableCharsets方法返回的是一个CharSet的完整列表,是Map形式,其中key是编码名称,value是Charset对象。同一种编码可能包含多个别名,比如示例中打印的ms936和ms_936,在使用Charset.forName方法获取Charset对象时,使用同一个编码的不同别名,都将获取到同一个编码的Charset对象。
获取基本类型
和DataInput接口类似,ByteBuffer类也有一系列方法可以直接获取基本类型:
package ch17.basic_type2;

import java.nio.ByteBuffer;

public class Main {
    public static void main(String[] args) {
        ByteBuffer bb = ByteBuffer.allocate(1024);
        bb.asCharBuffer().put("Hello world!");
        do {
            char c = bb.getChar();
            if (c == 0) {
                break;
            }
            System.out.print(c);
        } while (true);
        System.out.println();
        bb.rewind();
        bb.asShortBuffer().put((short) 9999999);
        System.out.println(bb.getShort());
        bb.rewind();
        bb.asIntBuffer().put(9999999);
        System.out.println(bb.getInt());
        bb.rewind();
        bb.asLongBuffer().put(9999999);
        System.out.println(bb.getLong());
        bb.rewind();
        bb.asFloatBuffer().put(9999999);
        System.out.println(bb.getFloat());
        bb.rewind();
        bb.asDoubleBuffer().put(9999999);
        System.out.println(bb.getDouble());
    }
}
// Hello world!
// -27009
// 9999999
// 9999999
// 9999999.0
// 9999999.0
就像示例中展示的,可以用各种类型的缓冲视图写入数据,然后用getXXX方法读取。
需要注意的是,每次重新写入数据时必须调用bb.rewind方法重置ByteBuffer的position游标。
此外,默认情况的整型字面量都是int类型,因此尝试将9999999传入put(short s)类型的方法时会出错,需要显式强制转换为short类型后再传入,当然这样做会发生“信息丢失”。
缓冲视图
就像上面示例展示的,ByteBuffer可以使用多种类型的缓冲视图来写入数据,实际上我们也可以用它们读取数据,这样做往往比使用getXXX更灵活。此外,因为原始的ByteBuffer对象以byte为单位,我们也不能在使用类似getChar等方法遍历读取超过1个字节以上的数据时使用hasRemaining方法作为遍历结束的判断依据。但是如果是相应的视图,就不存在类似的问题:
package ch17.buffer_view;

import java.nio.ByteBuffer;
import java.nio.IntBuffer;

public class Main {
    public static void main(String[] args) {
        ByteBuffer bb = ByteBuffer.allocate(1024);
        IntBuffer ib = bb.asIntBuffer();
        for (int i = 0; i < 10; i++) {
            ib.put(i);
        }
        ib.flip();
        printIntBuffer(ib);
        ib.put(2, 999);
        ib.rewind();
        printIntBuffer(ib);
    }

    private static void printIntBuffer(IntBuffer ib) {
        while (ib.hasRemaining()) {
            System.out.print(ib.get() + " ");
        }
        System.out.println();
    }
}
// 0 1 2 3 4 5 6 7 8 9
// 0 1 999 3 4 5 6 7 8 9
需要注意的是,缓冲视图虽然底层使用的是ByteBuffer的字节数组,但因为操作数据的单位不同(比如IntBuffer单位就是4字节),所以使用单独的一套游标。
这意味着我们在操作缓冲视图时需要像使用ByteBuffer一样,在写入数据后,从头遍历数据时,就需要调用flip将limit游标移动到合适的位置,并将postion游标指向起始位置。
因为视图可以根据当前类型正确移动N个字节,所以可以用随机访问的方式指定下标来修改数据,比如示例中直接使用ib.put(2, 999)将第三个整数修改为999。当然,在这之后需要重置position游标以重新遍历,不过因为不需要重新调整limit游标,所以只需要调用rewind方法即可(也可以在printIntBuffer起始位置调用该方法,这样可以确保每次遍历前都重置position游标)。
缓冲视图仅仅只是“视图”,底层依然使用的是ByteBuffer的字节数组,所以包含同样一组字节序列的ByteBuffer,使用不同的视图会“获取”到不同的数据:
package ch17.basic_type;

import java.nio.ByteBuffer;
import java.nio.CharBuffer;
import java.nio.DoubleBuffer;
import java.nio.FloatBuffer;
import java.nio.IntBuffer;
import java.nio.LongBuffer;
import java.nio.ShortBuffer;

import util.Fmt;

public class Main {
    public static void main(String[] args) {
        ByteBuffer bb = ByteBuffer.wrap(new byte[] { 0, 0, 0, 0, 0, 0, 0, 'a' });
        int index = 0;
        while (bb.hasRemaining()) {
            Fmt.printf("%d=>%s ", index++, bb.get());
        }
        System.out.println();
        bb.rewind();
        CharBuffer cb = bb.asCharBuffer();
        index = 0;
        while (cb.hasRemaining()) {
            char c = cb.get();
            Fmt.printf("%d=>%s ", index++, c);
        }
        System.out.println();
        index = 0;
        ShortBuffer sb = bb.asShortBuffer();
        while (sb.hasRemaining()) {
            Fmt.printf("%d=>%s ", index++, sb.get());
        }
        System.out.println();
        index = 0;
        IntBuffer ib = bb.asIntBuffer();
        while (ib.hasRemaining()) {
            Fmt.printf("%d=>%s ", index++, ib.get());
        }
        System.out.println();
        index = 0;
        FloatBuffer fb = bb.asFloatBuffer();
        while(fb.hasRemaining()){
            Fmt.printf("%d=>%s ", index++, fb.get());
        }
        System.out.println();
        index = 0;
        LongBuffer lb = bb.asLongBuffer();
        while(lb.hasRemaining()){
            Fmt.printf("%d=>%s ", index++, lb.get());
        }
        System.out.println();
        index = 0;
        DoubleBuffer db = bb.asDoubleBuffer();
        while(db.hasRemaining()){
            Fmt.printf("%d=>%s ", index++, db.get());
        }
        System.out.println();
    }
}
// 0=>0 1=>0 2=>0 3=>0 4=>0 5=>0 6=>0 7=>97
// 0=> 1=> 2=> 3=>a
// 0=>0 1=>0 2=>0 3=>97
// 0=>0 1=>97
// 0=>0.0 1=>1.36E-43
// 0=>97
// 0=>4.8E-322
这个例子相当有趣,同样的底层数据,用不同的视图可以读取出不同的结果。
这里有个细节,每次从
ByteBuffer创建视图时,视图的position游标会被初始化为ByteBuffer的position游标,而非是设置为0。这也是为什么在遍历完ByteBuffer后,创建第一个视图CharBuffer前需要调用bb.rewind方法重置视图的position游标。但之后创建其它视图就不需要重复调用rewind方法,因为从视图读取数据只会影响视图的游标,并不会影响原始ByteBuffer的游标。
这里使用一个长度为8的字节数组来初始化ByteBuffer,并且前7个字节用0来初始化,最后一个字节用字符a初始化,而a的ASC II值正是97,因此对ByteBuffer按字节遍历会看到0 0 0 ... 97这样的输出结果。
但理解之后的结果可能会有些困难,使用下面这张图会更直观:
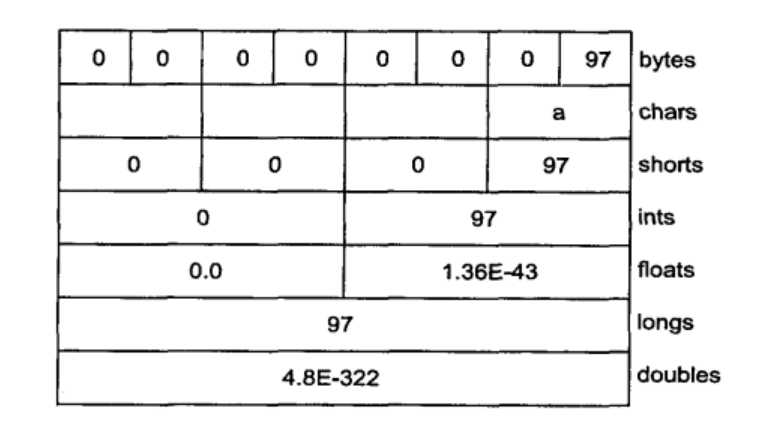
图源:《Java编程思想》
读取结果是和数据类型的长度密切相关的,比如:
-
char是两个字节,0对应空字符,97对应
a。 -
short是2个字节。
-
int是4个字节。
-
float是4个字节,但浮点数是包含整数部分和小数部分的,所以读取结果与整数不同。
-
long是8字节。
-
double是8字节。
并不需要记忆数据类型的位数,因为Java中有常量可以使用,比如Integer.BYTES。但这些位数之间的关系是很容易理解和记忆的,同样是整型,short的位数是int的一半,long的位数是int的两倍。而同样是浮点数,double的位数是float的两倍,因此float被称作“双精度浮点数”。
还需要注意的是,char的位数是双字节,更准确地说是,其对应的是UTF-16编码。UTF-16编码是定长编码,由双字节构成,虽然其可以表示大部分字符(包含中文),但是它有两个缺点:
-
相比最长4字节的
UTF-8来说,理论字符集容量依然有限,尤其是很多emoji符号都被字符集收录的今天,这是不够的。 -
作为一种定长编码,无法兼容最古老也最通用的
ASC II编码。
因此可能很多程序员(比如我),更熟悉UTF-8编码,事实上,如今很多程序和应用都已默认使用UTF-8作为默认字符集,Go语言中甚至有一种数据类型rune完全对应一个UTF-8字符。也就是说UTF-16已经逐渐被UTF-8取代,这可以看做是Java的又一个“历史包袱”。
这也解释了为什么
CharBuffer使用的是UTF-16编码而非UTF-8,因为char本身就被定义为使用UTF-16这种双字节定长编码。
这里我们要搞清楚的是,在Java中,同一段内容,使用ASC II、UTF-16和UTF-8编码,会产生不同的字节序列,当然如果编码的内容都属于ASC II字符集,ASC II编码和UTF-8编码会一致,因为后者作为一种1~4字节长度的变长编码,兼容前者。
我们可以用一个示例来证明这些内容:
package ch17.encode6;

import java.io.UnsupportedEncodingException;
import java.nio.ByteBuffer;
import java.util.Arrays;

public class Main {
    public static void main(String[] args) throws UnsupportedEncodingException {
        String msg = "Hello world!";
        printBytes(msg.getBytes());
        printBytes(msg.getBytes("ASCII"));
        printBytes(msg.getBytes("UTF-16BE"));
        printBytes(msg.getBytes("UTF-8"));
        ByteBuffer bb = ByteBuffer.allocate(255);
        bb.asCharBuffer().put(msg);
        bb.limit(msg.getBytes("UTF-16BE").length);
        StringBuilder sb = new StringBuilder();
        sb.append("[");
        while(bb.hasRemaining()){
            sb.append(bb.get());
            sb.append(", ");
        }
        sb.delete(sb.length()-2, sb.length());
        sb.append("]");
        System.out.println(sb.toString());
    }

    private static void printBytes(byte[] b) {
        System.out.println(Arrays.toString(b));
    }
}
// [72, 101, 108, 108, 111, 32, 119, 111, 114, 108, 100, 33]
// [72, 101, 108, 108, 111, 32, 119, 111, 114, 108, 100, 33]
// [0, 72, 0, 101, 0, 108, 0, 108, 0, 111, 0, 32, 0, 119, 0, 111, 0, 114, 0, 108, 0, 100, 0, 33]
// [72, 101, 108, 108, 111, 32, 119, 111, 114, 108, 100, 33]
// [0, 72, 0, 101, 0, 108, 0, 108, 0, 111, 0, 32, 0, 119, 0, 111, 0, 114, 0, 108, 0, 100, 0, 33]
这个示例说明了:
-
默认的
String.getBytes方法返回的字节数组是以UTF-8编码的。 -
UTF-8编码兼容ASCII编码。 -
CharBuffer类和char基本类型均使用UTF-16BE进行编码。
这个示例中有一点比较棘手,在通过
CharBuffer视图写入字符串后,要遍历ByteBuffer就存在困难,因为此时limit游标是0,且无法通过flip方法设置合适的limit游标。最终只能是用已知的UTF-16BE编码长度来手动设置limit游标以顺利进行遍历。
事实上编码还有一个字节存放顺序的问题,也就是所谓的高位优先(big endian)和低位优先(little endian)。所谓的高位优先,指的是先将高位数据存储在低地址的字节中,低位数据存储在高地址的字节中。低位优先则相反。
在上面的示例中,H字符对应的UTF-16编码字节[0,72]实际上就是高位优先,因为H字符的ASCII值是72,对应的二进制字符串是0000000001001000。需要注意的是,这是一个我们习惯的数学表示,即将高位数字放在左侧,低位数字放在右侧,如果是计算机内存,就需要考虑如何按地址大小来分配字节进行存储。
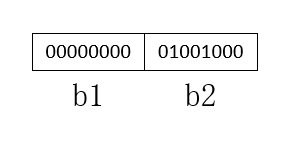
假设有内存中有这样两个字节存储H字符:
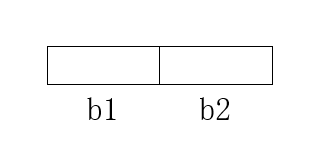
其中b1<b2,也就是b1是一个低地址字节,b2是一个高地址字节。
如果采用低位优先,就会是这样:
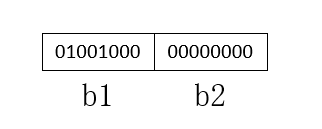
如果是高位优先,就会是这样:
自然,高位优先要按照高位优先的方式存储和读取,低位优先也要按照低位优先的方式存储和读取,否则就会导致读取到的数据有问题,类似于编码和解码使用了不同的字符集会导致乱码。
高位优先和低位优先的确容易让人混淆,事实上"big endian"和"little endian"这个术语来自《格列佛游记》,原意指剥鸡蛋是磕大头还是磕小头(对应书中的大头党和小头党),在这里其实指存储数据从大地址还是小地址开始,需要明确的是,这里的开始暗含“按照从低位到高位的顺序存储数据”。对于双字节
UTF-16编码而言,BE(big endian)和LE(little endian)自然指的是从大地址字节开始存低8位,还是从小地址字节开始存低8位。《格列佛游记》是本相当有意思的小说,感兴趣的可以去阅读,该作品也有多个影视改编作品可以观看。
事实上ByteBuffer可以显式指定字节存放顺序:
package ch17.encode_order;

import java.nio.ByteBuffer;
import java.nio.ByteOrder;

import util.BytesConvert;

public class Main {
    public static void main(String[] args) {
        byte[] bytes = new byte[2];
        ByteBuffer bb = ByteBuffer.wrap(bytes);
        bb.asCharBuffer().put('H');
        System.out.println(convertBytes2BinaryStr(bytes));
        bb.rewind();
        bb.order(ByteOrder.LITTLE_ENDIAN);
        bb.asCharBuffer().put('H');
        System.out.println(convertBytes2BinaryStr(bytes));
        bb.rewind();
        bb.order(ByteOrder.BIG_ENDIAN);
        bb.asCharBuffer().put('H');
        System.out.println(convertBytes2BinaryStr(bytes));
    }

    public static String convertBytes2BinaryStr(byte[] bytes) {
        StringBuilder sb = new StringBuilder();
        for (byte b : bytes) {
            sb.append(BytesConvert.convertByteToBinaryStr(b));
        }
        return sb.toString();
    }
}
// 0000000001001000
// 0100100000000000
// 0000000001001000
这个示例说明了默认情况下ByteBuffer使用的字节存放顺序是ByteOrder.BIG_ENDIAN,也就是高位优先,这种方式也符合我们的习惯,因为遍历字节时是按照从低位字节到高位的顺序,这恰好符合我们从左往右依次是高位到低位的数学计数的习惯。
这里选择使用现有字节数组构建
ByteBuffer而非通过ByteBuffer.allocate是为了更方便地查看结果。
缓冲操作
ByteBuffer、CharBuffer等都继承自Buffer类,这也是一个java.nio包中表示缓冲的抽象基类。
缓冲最关键的是这几个游标:
-
position,表示当前位置。 -
mark,表示上一次标记的位置,其作用类似于书签。 -
limit,标记最后一个有效数据。 -
capacity,标记缓冲区的最后一个可用的存储空间。
Buffer的主要操作都和上面这几个游标直接相关:
-
capacity(),返回缓冲区的最大容量。 -
clear(),清空缓冲区中的数据,position被设置为0,limit被设置为capacity,mark被撤销。 -
flip(),“翻转”缓冲区,limit被设置为position,position被设置为0,撤销mark。 -
limit(),返回缓冲区中的有效数据个数。 -
limit(int newLimit),设置limit,如果position大于新设置的limit,position会被设置为新的limit,如果mark大于新的limit,mark将被撤销。 -
mark(),将mark设置为当前position指向的位置。 -
reset(),将position设置为mark指向的位置。 -
position(),返回position。 -
position(int newPosition),设置position。 -
remaining(),返回limit和position的差值(还剩几个元素没有遍历)。 -
hasRemaining,检测position和limit之间是否还有元素(是否还有元素没有遍历)。
下面是一个简单示例,可以通过操作缓冲区,让缓冲中的数据以字符为单位两两调换位置:
package ch17.buffer;

import java.io.UnsupportedEncodingException;
import java.nio.ByteBuffer;
import java.nio.CharBuffer;

public class Main {
    public static void main(String[] args) throws UnsupportedEncodingException {
        ByteBuffer bb = ByteBuffer.wrap("Hello world!".getBytes("UTF-16BE"));
        CharBuffer cb = bb.asCharBuffer();
        System.out.println(cb);
        exchangeCharBuffer(cb);
        System.out.println(cb);
        exchangeCharBuffer(cb);
        System.out.println(cb);
    }

    private static void exchangeCharBuffer(CharBuffer cb){
        cb.rewind();
        while(cb.hasRemaining()){
            cb.mark();
            char c1 = cb.get();
            char c2 = cb.get();
            cb.reset();
            cb.put(c2);
            cb.put(c1);
        }
        cb.rewind();
    }
}
// Hello world!
// eHll oowlr!d
// Hello world!
要明确的是,get()的用途是将当前position的数据返回,并将position移动到下个位置,而put则是将数据写入当前position指向的位置,并将position移动到下个位置。
而这里为了调换相邻的两个元素,选择先使用mark记录单次遍历时position的起始位置,然后使用get依次读取两个元素,最后使用reset()将position游标重置回mark标记的单次循环的起始位置(也就是回退两个元素的位置),这时候再使用put()依次写入第二个和第一个读到的元素,就完成了元素交换。
文件映射
有时候我们需要处理一个大容量文件,此时读取全部内容到内存中往往是不现实的,但只读取部分又显得很麻烦,比如各部分之间有关联性之类的。这种情况下文件映射就提供了一个不错的解决方案,它可以将整个文件“映射”到内存中,让你可以随意访问文件的各个部分,就像是全部内容都读取到了内存中一样,但实际上仅会读取你当前操作的一部分数据,而其他数据只会在需要时加载。
类似的思路广泛存在于编程领域,比如说生成器。Android的
Gallery组件可能更直观,我们在安卓APP上经常会遇到那种全屏显示一组图片,并且可以左滑和右滑切换图片,这实际上就是Gallery组件。事实上显示图片相当消耗内存资源,所以Android系统无法也不可能同时加载所有图片到内存中,但是仅加载当前一个图片,然后在用户滑动图片后再加载目标图片到内存也不可行,那样会导致加载速度慢,用户体验差的问题。所以最终Gallery组件的解决方式是,一次性加载当前图片和相邻的若干张图片(通常是前一张和后一张),并在用户滑动后加载所需的图片,并将不需要的图片移出内存,最终的效果就是我们所见的,用户几乎不会有所察觉。
package ch17.file_map;

import java.io.IOException;
import java.io.RandomAccessFile;
import java.nio.MappedByteBuffer;
import java.nio.channels.FileChannel;
import java.nio.channels.FileChannel.MapMode;

public class Main {
    public static void main(String[] args) throws IOException {
        final String CURRENT_DIR = "./xyz/icexmoon/java_notes/ch17/file_map/";
        final String FILE = CURRENT_DIR + "data.out";
        final int SIZE = 0x8FFFFFF;// 128MB
        RandomAccessFile raf = new RandomAccessFile(FILE, "rw");
        FileChannel fc = raf.getChannel();
        MappedByteBuffer mbb = fc.map(MapMode.READ_WRITE, 0, SIZE);
        for (int i = 0; i < SIZE; i++) {
            mbb.put((byte) 'x');
        }
        for (int i = SIZE / 2; i < SIZE / 2 + 6; i++) {
            System.out.print((char) mbb.get(i) + " ");
        }
        System.out.println();
        fc.close();
        raf.close();
    }
}
// x x x x x x
上面这个示例展示了如何使用文件映射创建一个128MB大小的文件,并读取其中的部分内容。当然,修改部分内容也是可以的。
就像示例中展示的,可以通过FileChannel.map方法获取一个MappedByteBuffer类型的文件映射,该类继承自ByteBuffer,所以支持ByteBuffer的所有操作。
通过文件映射,我们就可以像操作普通文件那样操作一个大文件。
文件加锁
文件锁是一种系统级锁(有别于线程锁),通过使用文件锁,我们可以在多个进程之间“同步地”访问和修改文件。
package ch17.file_lock;
import java.io.IOException;
import java.io.RandomAccessFile;
import java.nio.channels.FileChannel;
import java.nio.channels.FileLock;
import java.util.concurrent.TimeUnit;
public class Main {
public static void main(String[] args) throws IOException, InterruptedException {
final String CURRENT_DIR = "./xyz/icexmoon/java_notes/ch17/file_lock/";
final String FILE = CURRENT_DIR + "Main.java";
RandomAccessFile raf = new RandomAccessFile(FILE, "rw");
FileChannel fc = raf.getChannel();
FileLock fl = fc.tryLock();
if (fl != null) {
System.out.println("get file lock.");
TimeUnit.SECONDS.sleep(1);
fl.release();
System.out.println("file lock is released.");
}
fc.close();
raf.close();
}
}
// get file lock.
// file lock is released.
通过FileChannel.tryLock我们可以获取通道连接的文件的文件锁,在持有文件锁时,其它进程是无法读取和修改文件的。
tryLock方法是非阻塞式地获取文件锁,如果失败不会导致当前程序阻塞,lock方法可以阻塞式获取文件锁,如果失败将导致程序阻塞,直到能够获取文件锁或当前进程被终止为止。
默认情况下获取的文件锁是对整个文件加锁,而有时候我们希望仅对文件的部分内容加锁,比如数据库文件。
我们都知道数据库执行SQL时仅会加表级锁或者行级锁,除了加锁部分的数据意外并不影响其他数据的查询和修改,实际上这也是依靠文件锁实现的,这也就意味着每次对数据库文件加锁只能对部分数据加文件锁,对整个文件加锁就会导致整个数据库对其它进程不可用。
下面通过一个示例说明如何部分加锁:
package ch17.file_lock2;
import java.io.IOException;
import java.io.RandomAccessFile;
import java.nio.ByteBuffer;
import java.nio.MappedByteBuffer;
import java.nio.channels.FileChannel;
import java.nio.channels.FileLock;
import java.nio.channels.FileChannel.MapMode;
class LockAndModify extends Thread {
ByteBuffer bb;
FileChannel fc;
int start;
int length;
public LockAndModify(ByteBuffer bb, int start, int length, FileChannel fc) {
this.bb = bb.slice(start, length);
this.fc = fc;
this.start = start;
this.length = length;
}
public void run() {
super.run();
try {
FileLock fl = fc.lock(start, length, false);
try {
while (bb.position() < bb.limit() - 1) {
byte b1 = bb.get();
bb.put((byte) (b1 + 1));
}
} finally {
fl.release();
}
} catch (IOException e) {
throw new RuntimeException(e);
}
}
}
class LockAndRead extends Thread {
ByteBuffer bb;
FileChannel fc;
int start;
int length;
public LockAndRead(ByteBuffer bb, int start, int length, FileChannel fc) {
this.bb = bb.slice(start, length);
this.fc = fc;
this.start = start;
this.length = length;
}
public void run() {
super.run();
try {
FileLock fl = fc.lock(start, length, false);
try {
StringBuffer sb = new StringBuffer();
while (bb.hasRemaining()) {
sb.append((char) bb.get());
sb.append(" ");
}
System.out.println(sb.toString());
} finally {
fl.release();
}
} catch (IOException e) {
throw new RuntimeException(e);
}
}
}
public class Main {
public static void main(String[] args) throws IOException {
final String CURRENT_DIR = "./xyz/icexmoon/java_notes/ch17/file_lock2/";
final String FILE = CURRENT_DIR + "data.out";
final int SIZE = 0x8FFFFFF;
RandomAccessFile raf = new RandomAccessFile(FILE, "rw");
FileChannel fc = raf.getChannel();
MappedByteBuffer mbb = fc.map(MapMode.READ_WRITE, 0, SIZE);
for (int i = 0; i < SIZE; i++) {
mbb.put((byte) 'x');
}
new LockAndModify(mbb, SIZE / 4, 10, fc).start();
new LockAndModify(mbb, SIZE / 2, 10, fc).start();
new LockAndRead(mbb, SIZE / 4, 10, fc).start();
new LockAndRead(mbb, SIZE / 2, 10, fc).start();
// fc.close();
// raf.close();
}
}
// x y x y x y x y x y
// x y x y x y x y x y
示例中创建了两个继承自Thread的类LockAndModify和LockAndRead,前者用于对文件部分加锁并修改数据,后者用于对文件部分加锁并读取数据。在主进程main中依次使用这两个类创建了4个线程并启动,最终的效果就是对大文件的部分数据以加锁的方式修改后显示结果。
需要注意的是,这个程序不能在主进程最后显式地关闭通道或文件,就像注释的那两行代码做的那样。这是因为在使用Thread.start启动四个线程后,如果主线程立即关闭通道或文件,就会导致线程中引用的通道和文件不可用,相应的文件映射自然也不可用。正确的方式应当是通过其它途径等待那4个线程执行完毕后再显式关闭通道和文件,但这些内容属于多线程编程的部分,所以这里最简单的方式是不做任何关闭动作,将这些工作交给Java虚拟机,它会在程序执行完毕后关闭相应的资源。


文章评论