自从去年底买了树莓派4b后一直用的官方提供的Linux发行版Raspbian,一直也没有太大问题,所以就一直用着了。
但是之前某次更新软件后发现kodi不能进行H265视频硬解了,尝试了很多方法都没有解决,一怒之下就只能转投Ubuntu阵营了,而且惊奇地发现Ubuntu这边给树莓派专门做了发行版,并且还提供了一个专门为树莓派硬件“优化”过的桌面版,而且和官方提供的Raspbian不同的是,还是64位,那有啥说的,装就完事了。
Ubuntu官方的树莓派发行版安装页面是。

左侧是长期维护版本,右侧是尝鲜版,下边还有一个桌面版,安装有完整Ubuntu桌面,对新人更友好,相应的也更吃内存。因为非桌面版也可以后续安装桌面,所以这里选择长期稳定版(Ubuntu Server LTS)。
桌面版硬件要求为树莓派4b 2G以上版本。
在漫长的一个下午,我烧录了三次,从稳定版到尝鲜版再跳回稳定版...别问我经历了什么...
安装包不大,不到1G,没用迅雷就轻松下载完毕。
官方安装教程在:

这里有一些安装前准备清单,有兴趣的可以看一下。
插入SD卡读卡器和SD卡,下载:

根据你当前电脑的操作系统进行选择:Ubuntu/Windows/Mac OS。
下载安装完后运行:
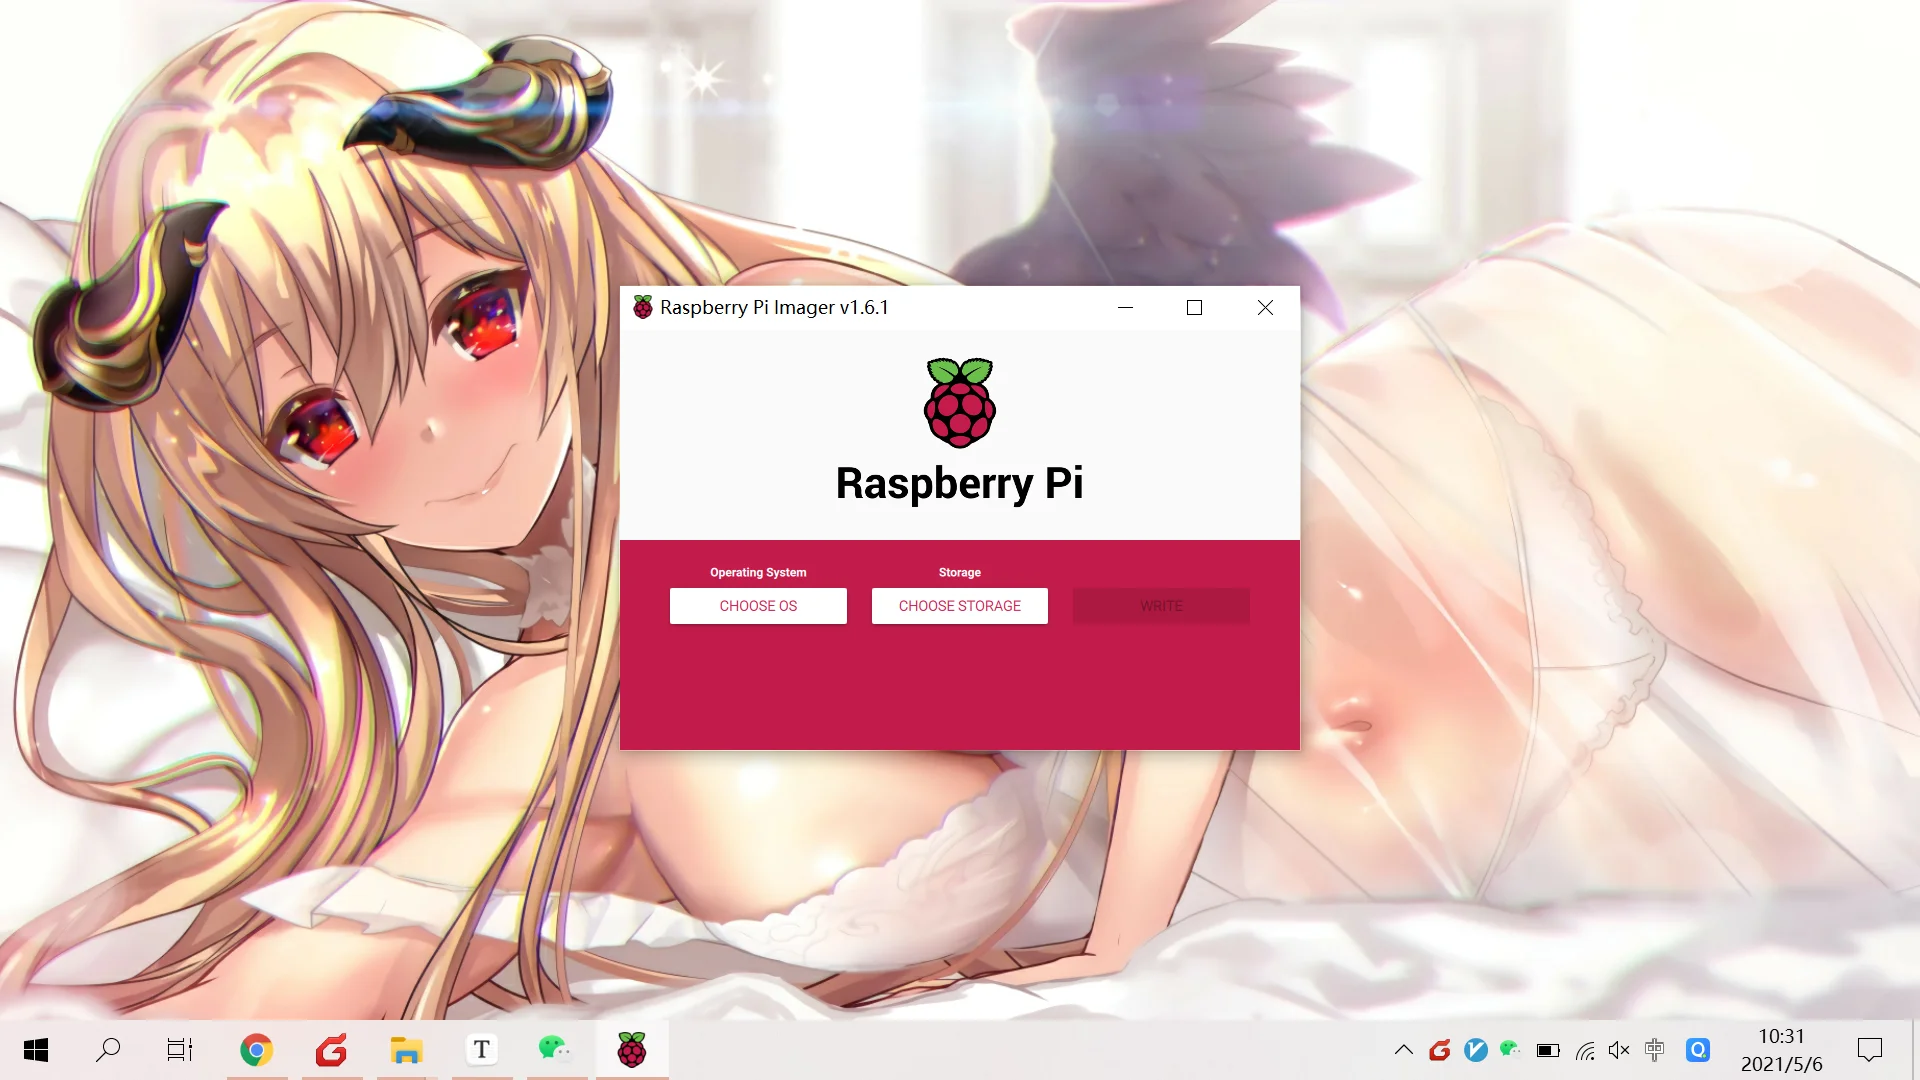
选择操作系统版本和SD卡盘符:
-
点击CHOOSE OS选择CUSTOM后选择刚才下载好的系统镜像。
-
点击CHOOSE STORAGE后选择SD卡所在盘符,如果没有格式化会有两个盘符,会自动一并选上。
-
点击WRITE开始烧录。
烧录后会丢失原SD卡上的数据,请做好备份工作。
最好不要通过非custom方式通过内置的源下载烧录,那样速度会超级慢。
烧录好后修改无线配置以开机后自动连接到路由器:

烧录完后如果找不到盘符,可以重新插拔读卡器。
写入无线配置:
如果使用网线,跳过这一步。
# This file contains a netplan-compatible configuration which cloud-init # will apply on first-boot. Please refer to the cloud-init documentation and # the netplan reference for full details: # # https://cloudinit.readthedocs.io/ # https://netplan.io/reference # # Some additional examples are commented out below version: 2 ethernets: eth0: dhcp4: true optional: true wifis: wlan0: dhcp4: true optional: true access-points: "<network name>": password: "<password>"
之前使用Raspbian系统的时候无线连接经常抽风,经过测试后发现只有WIFI 5G可以稳定连接,无奈家里移动附赠的路由器太渣,不支持5G,只能有线连接解决。
我用Ubuntu尝试了一下,发现也不能支持WIFI 4G连接,看来是硬件问题。
从PC拔除读卡器,并启动树莓派。
启动后需要先经过cloud-init,在第一次显示光标login的时候不要急着登录,等待cloud-init完毕后再登录。
这里有个相当坑爹的事,就是如果你不给树莓派接键盘,Ubuntu启动后会卡在Cloud-init之后,毫无反应,不会出现登录选项,登录的光标只会在接了键盘后出现。
还有个坑爹的事就是官方提供的查看树莓派IP的方式相当不靠谱,至少我在windows笔记本上用power shell执行
arp是毛用没有。默认用户名是
ubuntu,密码是ubuntu。
通过一番折腾后终于用笔记本连上了Ubuntu。
需要XShell等连接工具的可以阅读。
旧版本的XShell可能是连接不上的,解决方案是使用新版,或者用WindowsTerminal。
新版XShell7官方提供非商业免费版本,下载可以阅读这里。
想使用WindowsTerminal进行连接的可以阅读。
如果使用WindowsTerminal连接出现报错,可能是主机的加密密钥已经改变导致,可以尝试通过
ssh -R <remote_ip>来解决。
修改软件源
接下来首先要做的就是改软件仓库的源了:
cd /etc/apt
sudo cp sources.list cources.list.backup
sudo vi sources.list
将官方源替换为阿里源,可以参照以下进行修改:
## Note, this file is written by cloud-init on first boot of an instance
## modifications made here will not survive a re-bundle.
## if you wish to make changes you can:
## a.) add 'apt_preserve_sources_list: true' to /etc/cloud/cloud.cfg
## or do the same in user-data
## b.) add sources in /etc/apt/sources.list.d
## c.) make changes to template file /etc/cloud/templates/sources.list.tmpl
# See http://help.ubuntu.com/community/UpgradeNotes for how to upgrade to
# newer versions of the distribution.
#deb http://ports.ubuntu.com/ubuntu-ports focal main restricted
deb https://mirrors.aliyun.com/ubuntu-ports/ focal main restricted
# deb-src http://ports.ubuntu.com/ubuntu-ports focal main restricted
## Major bug fix updates produced after the final release of the
## distribution.
#deb http://ports.ubuntu.com/ubuntu-ports focal-updates main restricted
deb https://mirrors.aliyun.com/ubuntu-ports/ focal-updates main restricted
# deb-src http://ports.ubuntu.com/ubuntu-ports focal-updates main restricted
## N.B. software from this repository is ENTIRELY UNSUPPORTED by the Ubuntu
## team. Also, please note that software in universe WILL NOT receive any
## review or updates from the Ubuntu security team.
#deb http://ports.ubuntu.com/ubuntu-ports focal universe
deb https://mirrors.aliyun.com/ubuntu-ports focal universe
# deb-src http://ports.ubuntu.com/ubuntu-ports focal universe
#deb http://ports.ubuntu.com/ubuntu-ports focal-updates universe
deb https://mirrors.aliyun.com/ubuntu-ports focal-updates universe
# deb-src http://ports.ubuntu.com/ubuntu-ports focal-updates universe
## N.B. software from this repository is ENTIRELY UNSUPPORTED by the Ubuntu
## team, and may not be under a free licence. Please satisfy yourself as to
## your rights to use the software. Also, please note that software in
## multiverse WILL NOT receive any review or updates from the Ubuntu
## security team.
#deb http://ports.ubuntu.com/ubuntu-ports focal multiverse
deb https://mirrors.aliyun.com/ubuntu-ports focal multiverse
# deb-src http://ports.ubuntu.com/ubuntu-ports focal multiverse
#deb http://ports.ubuntu.com/ubuntu-ports focal-updates multiverse
deb https://mirrors.aliyun.com/ubuntu-ports focal-updates multiverse
# deb-src http://ports.ubuntu.com/ubuntu-ports focal-updates multiverse
## N.B. software from this repository may not have been tested as
## extensively as that contained in the main release, although it includes
## newer versions of some applications which may provide useful features.
## Also, please note that software in backports WILL NOT receive any review
## or updates from the Ubuntu security team.
#deb http://ports.ubuntu.com/ubuntu-ports focal-backports main restricted universe multiverse
deb https://mirrors.aliyun.com/ubuntu-ports focal-backports main restricted universe multiverse
# deb-src http://ports.ubuntu.com/ubuntu-ports focal-backports main restricted universe multiverse
## Uncomment the following two lines to add software from Canonical's
## 'partner' repository.
## This software is not part of Ubuntu, but is offered by Canonical and the
## respective vendors as a service to Ubuntu users.
# deb http://archive.canonical.com/ubuntu focal partner
# deb-src http://archive.canonical.com/ubuntu focal partner
#deb http://ports.ubuntu.com/ubuntu-ports focal-security main restricted
deb https://mirrors.aliyun.com/ubuntu-ports focal-security main restricted
# deb-src http://ports.ubuntu.com/ubuntu-ports focal-security main restricted
#deb http://ports.ubuntu.com/ubuntu-ports focal-security universe
deb https://mirrors.aliyun.com/ubuntu-ports focal-security universe
# deb-src http://ports.ubuntu.com/ubuntu-ports focal-security universe
#deb http://ports.ubuntu.com/ubuntu-ports focal-security multiverse
deb https://mirrors.aliyun.com/ubuntu-ports focal-security multiverse
# deb-src http://ports.ubuntu.com/ubuntu-ports focal-security multiverse
这里
hirsute为Ubuntu 21.04的版本代号,focal为Ubuntu 20.04的版本代号,需要注意修改。
保存后就可以更新软件了:
sudo apt update
sudo apt upgrade
安装桌面
为了方便使用,先安装一个桌面:
sudo apt install xubuntu-desktop
xubuntu-desktop桌面比较大,安装时间较长,优点是界面美观,如果追求性能可以安装其它精简桌面。

安装中途会出现这个选项,要求你选择一个图形管理器。
-
关于它们的介绍可以看。
-
关于如何选择可以看,我这里选择的是gdm3。
安装好桌面后重启:
sudo reboot
应该就可以看到桌面登录界面了。
使用VNC连接
为了方便使用,还需要设置一下VNC连接:
登录后查看设置,sharing,发现这里是没有屏幕分享选项的,原因是安装的是最小安装,并非完整桌面版,所以这里需要单独安装:
sudo apt-get install vino
sudo apt-get install dconf-editor
安装好后重启:
sudo reboot
在树莓派桌面进行操作,启动dconf-editor,并进入org->gnome->desktop->remote-access后将requre-encryption设置为False。
安装xrdp:
sudo apt-get install xrdp
此时在ubuntu桌面查看setting>sharing,发现已经有screen sharing的选项了,但是最下方显示没有网络。
还需要继续折腾:
touch /etc/netplan/01-network-manager-all.yaml
vi /etc/netplan/01-network-manager-all.yaml
写入一下信息后保存:
network:
  version: 2
  renderer: NetworkManager
再次重启:
sudo reboot
现在再进入setting>sharing>screen sharing,应该就没问题了,启用之。
再通过windows vnc客户端进行连接,会显示未加密,不安全,直接忽略:

成功连接!
时间&语言
下面修改时间:

Time Zone设置为中国。
设置语言:

这里只有英文,所以需要安装语言包:
apt install language-pack-zh-hans
安装好后重新启动一下设置面板就能看到中文选项了:

设定好后重启。
自动登录
开启自动登录:
自动登录功能和桌面管理程序密切相关,所以必须针对不同的桌面管理程序修改不同的配置,这里是gdm3,如果你不是,请看。
sudo nano /etc/gdm3/custom.conf
将这两行注释去掉,并修改用户名。
AutomaticLoginEnable = true
AutomaticLogin = ubuntu
重启。
kodi
安装kodi:
sudo apt install kodi
sudo apt install kodi-pvr-iptvsimple
静态IP
我们还需要固定树莓派IP:
我尝试了通过GUI配置,结果发现重启后就失效了,原因不明,但是通过命令行是配置成功了。
cd /etc/netplan
sudo nano 01-network-manager-all.yaml
内容参考:
network:
  version: 2
  renderer: NetworkManager
  ethernets:
    eth0:   #配置的网卡名称
      dhcp4: no    #dhcp4关闭
      dhcp6: no    #dhcp6关闭
      addresses: [192.168.1.111/24]   #设置本机IP及掩码
      gateway4: 192.168.1.1   #设置网关
      nameservers:
          addresses: [192.168.1.1, 114.114.114.114]
测试:
sudo netplan try
应用:
sudo netplan apply
重启。
需要说明的是通过这种方式配置后我发现树莓派同时有两个ip:
一个是动态分配的,一个是静态的,两个都可以用。

移动硬盘挂载
挂载硬盘:
查看硬盘信息:
df -h

挂载:
sudo mkdir /mnt/newman_disk/
sudo umount /dev/sda1
sudo mount /dev/sda1 /mnt/newman_disk/
sudo chmod 777 /mnt/newman_disk/
查看UUID:
sudo blkid

修改fstab:
sudo nano /etc/fstab
参考信息:
UUID=1837D6D4A2FF848C /mnt/newman_disk ntfs defaults 0 0
结语
嗯,终于一切都搞好了,kodi跑起来了,但是悲剧的是我发现ubuntu资源消耗的厉害,热的飞起,同样是不开风扇,用Raspbian的时候我压根就没看到过温度报警图标,用ubuntu的时候就疯狂闪烁,摸了一下机盒,发现也很烫手,嗯,我打算明天装回Raspbian了。
这篇文章名字应该叫树莓派for ubuntu:从入门到劝退。
参考资料:


文章评论