Spring 提供一组 Aware 接口,可以利用它们在 bean 中获取容器或 bean 相关的句柄:
static class MyBean implements ApplicationContextAware, BeanNameAware, InitializingBean {
private String beanName;
private ApplicationContext applicationContext;
public void setBeanName(String name) {
this.beanName = name;
}
public void setApplicationContext(ApplicationContext applicationContext) throws BeansException {
this.applicationContext = applicationContext;
}
public void afterPropertiesSet() throws Exception {
// bean 被依赖注入后调用
log.info("Initializing Bean");
}
}
这使用了两个 Aware 接口:
-
ApplicationContextAware,获取容器句柄。 -
BeanNameAware,获取 bean 名称。
此外,还使用了一个生命周期钩子接口InitializingBean,其方法afterPropertiesSet对应的是@PostConstruct注解,它们都是在 bean 被创建,且完成了依赖注入后被调用。
通常我们会在此时完成自定义初始化的工作,比如解决循环引用的问题。
可以通过以下测试代码查看效果:
GenericApplicationContext ctx = new GenericApplicationContext();
ctx.registerBean(MyBean.class);
ctx.refresh();
MyBean bean = ctx.getBean(MyBean.class);
log.info(bean.toString());
ctx.close();
当然也可以通过依赖注入的方式获取相关信息:
static class MyBean2 {
private String beanName;
private ApplicationContext applicationContext;
public void init() {
beanName = applicationContext.getBeanNamesForType(MyBean2.class)[0];
log.info("Initializing Bean");
}
}
但需要明确的是,正如前面几篇提到的,@Autowired这些依赖注入注解都是用相应的 bean 后处理器来识别和进行依赖注入的。换言之,如果容器中不包含相应的 bean 后处理器,这些注解和依赖注入功能就不会生效。
比如:
GenericApplicationContext ctx = new GenericApplicationContext();
ctx.registerBean(MyBean2.class);
ctx.refresh();
MyBean2 bean = ctx.getBean(MyBean2.class);
log.info(bean.toString());
ctx.close();
获取不到任何信息,且@PostConstruct注解标记的生命周期钩子也不会被调用。要让它们生效,需要给容器添加对应的 bean 后处理器:
GenericApplicationContext ctx = new GenericApplicationContext();
ctx.registerBean(MyBean2.class);
ctx.registerBean(AutowiredAnnotationBeanPostProcessor.class);
ctx.registerBean(CommonAnnotationBeanPostProcessor.class);
ctx.refresh();
MyBean2 bean = ctx.getBean(MyBean2.class);
log.info(bean.toString());
ctx.close();
注解失效
在某些情况下会出现需要创建 Bean,但 Bean 所需的后处理器不存在的情况,这就会导致依赖相应 Bean 处理器的注解失效。
比如:
static class Config2{
private ApplicationContext ctx;
public void init(){
log.info("bean initializing");
}
public BeanFactoryPostProcessor beanFactoryPostProcessor(){
return beanFactory -> {
log.info("beanFactoryPostProcessor is called.");
};
}
}
在配置类中添加了一个 bean 方法,用于添加一个 bean 作为自定义工厂后处理器。
测试代码:
GenericApplicationContext ctx = new GenericApplicationContext();
ctx.registerBean(ConfigurationClassPostProcessor.class);
ctx.registerBean(AutowiredAnnotationBeanPostProcessor.class);
ctx.registerBean(CommonAnnotationBeanPostProcessor.class);
ctx.registerBean(Config2.class);
ctx.refresh();
log.info(ctx.getBean(Config2.class).toString());
ctx.close();
会发现配置类的@Autowired和@PostConstruct注解都失效了。
这是因为在执行ctx.refresh时,容器会做以下工作:
-
用 bean 定义创建工厂后处理器的实例。
-
执行工厂后处理器(通常用于添加更多的 bean 定义)。
-
创建并添加 bean 后处理器。
-
利用 bean 后处理器创建并初始化 bean。
在这里,配置类比较特殊,它自身是一个单例 bean,但同时提供工厂方法(bean 方法)以创建其它 bean。
当配置类中不存在创建工厂后处理器的 bean 时,配置类会被当做一个普通的 bean 按照正常流程创建和初始化:

但如果配置类中包含创建 bean 工厂后处理器的 bean 方法,就会被提前创建:
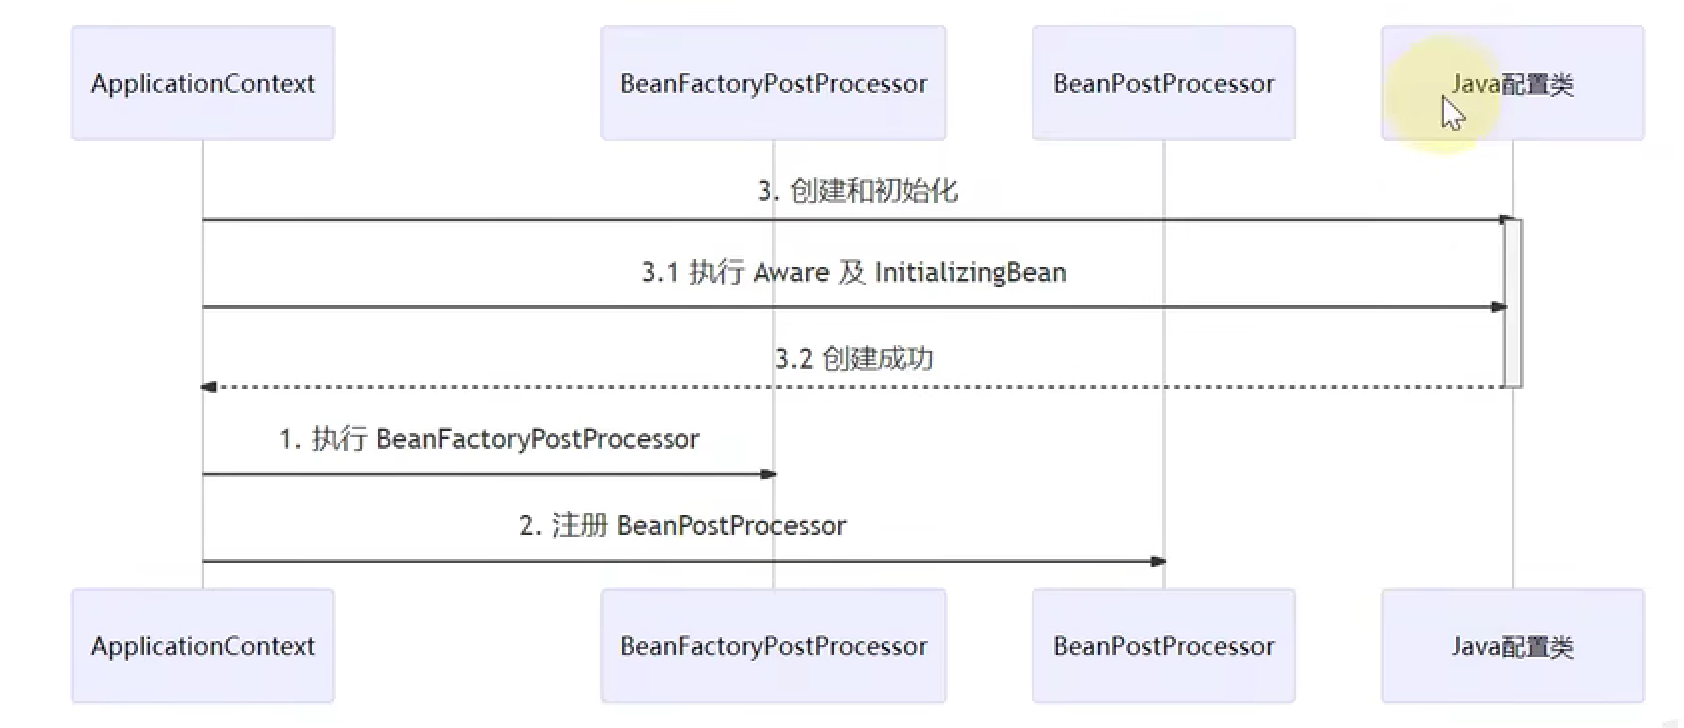
因为容器需要先创建所有工厂后处理器,并调用这些工厂后处理器后才能创建并使用 bean 的后处理器。而因为配置类中包含一个创建工厂后处理器的 bean 方法,因此配置类不得不被提前创建,而此时容器中没有任何 bean 的后处理器被创建。所以依赖于 bean 后处理器的相关注解都失效了。
解决思路
根据上面说的注解失效的原因,有两种解决思路。
第一种是对配置类重构,让其不包含用于创建工厂后处理器的 bean 方法。使用单独的类定义工厂后处理器,并注册到工厂:
static class Config3{
private ApplicationContext ctx;
public void init(){
log.info("bean initializing");
}
}
static class MyBeanFactoryPostProcessor implements BeanFactoryPostProcessor{
public void postProcessBeanFactory(ConfigurableListableBeanFactory beanFactory) throws BeansException {
log.info("beanFactoryPostProcessor is called.");
}
}
测试代码:
GenericApplicationContext ctx = new GenericApplicationContext();
ctx.registerBean(ConfigurationClassPostProcessor.class);
ctx.registerBean(AutowiredAnnotationBeanPostProcessor.class);
ctx.registerBean(CommonAnnotationBeanPostProcessor.class);
ctx.registerBean(Config3.class);
ctx.registerBean(MyBeanFactoryPostProcessor.class);
ctx.refresh();
log.info(ctx.getBean(Config3.class).toString());
ctx.close();
第二种就是修改配置类,不使用依赖 bean 后处理器的注解,直接使用接口实现相应功能:
@Slf4j
@ToString
static class Config4 implements ApplicationContextAware, InitializingBean {
    @Getter
    private ApplicationContext ctx;

    @Bean
    public BeanFactoryPostProcessor beanFactoryPostProcessor(){
        return beanFactory -> {
            log.info("beanFactoryPostProcessor is called.");
        };
    }

    @Override
    public void setApplicationContext(ApplicationContext applicationContext) throws BeansException {
        this.ctx = applicationContext;
    }

    @Override
    public void afterPropertiesSet() throws Exception {
        log.info("bean initializing");
    }
}
测试代码不需要改动,这里不做赘述。
初始化和销毁
Spring 提供三种途径的 Bean 初始化和销毁调用:
-
通过注解(
@Postconstruct等) -
通过接口(
InitializingBean等) -
通过 bean 方法(
@Bean(initMethod=...))
它们之间有特定的调用先后顺序。
创建一个 Bean 定义,同时使用这三种方式触发创建和销毁时的回调:
@Slf4j
static class MyBean implements InitializingBean, DisposableBean {
    @PostConstruct
    public void init() {
        log.info("MyBean init by @PostConstruct");
    }

    @Override
    public void afterPropertiesSet() throws Exception {
        log.info("MyBean init by InitializingBean interface");
    }

    public void afterInstantiation(){
        log.info("MyBean init by @Bean");
    }

    @Override
    public void destroy() throws Exception {
        log.info("MyBean destroy by DisposableBean interface");
    }

    @PreDestroy
    public void preDestroy(){
        log.info("MyBean destroy by @PreDestroy");
    }

    public void beforeDestroy(){
        log.info("MyBean destroy by @Bean");
    }
}

@Configuration
static class Config{
    @Bean(initMethod = "afterInstantiation", destroyMethod = "beforeDestroy")
    public MyBean myBean() {
        return new MyBean();
    }
}
测试:
GenericApplicationContext ctx = new GenericApplicationContext();
ctx.registerBean(CommonAnnotationBeanPostProcessor.class);
ctx.registerBean(ConfigurationClassPostProcessor.class);
ctx.registerBean(Config.class);
ctx.refresh();
ctx.close();
执行结果:
 -- MyBean init by @PostConstruct
 -- MyBean init by InitializingBean interface
 -- MyBean init by @Bean
 -- MyBean destroy by @PreDestroy
 -- MyBean destroy by DisposableBean interface
 -- MyBean destroy by @Bean
因此它们的执行顺序是:
-
执行由注解定义的创建/销毁方法。
-
执行通过接口定义的创建/销毁方法。
-
执行通过 bean 方法定义的创建/销毁方法。
本文的完整示例代码可以从获取。
The End.


文章评论