本文使用的示例项目可以从下载并解压。
1.1.继承体系
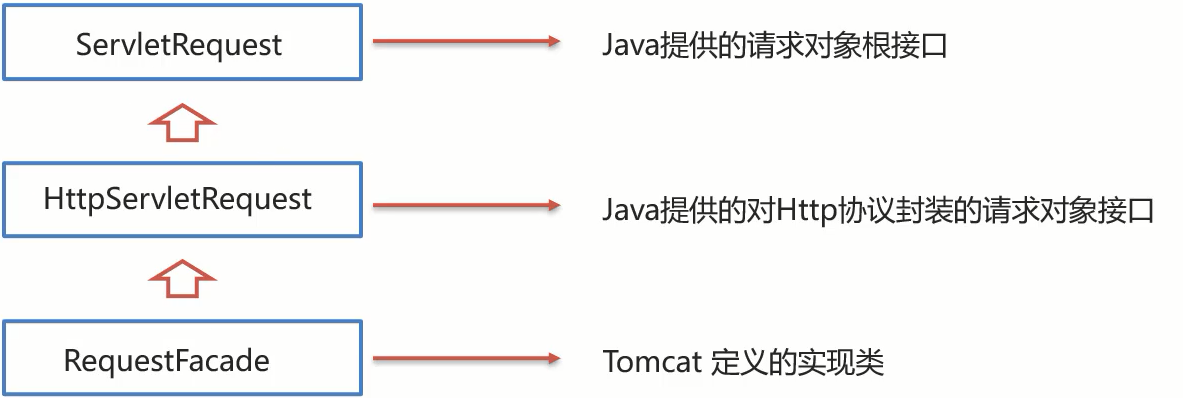
Servlet 将 HTTP 请求封装为 ServletRequest 类型,这个类有如下继承体系:
1.2.获取请求数据
1.2.1.请求行
HTTP 请求报文中的请求行信息类似这样:
GET /archives/620.html HTTP/1.1
包含 Request Method、URL、HTTP 协议版本这三个信息。
可以通过 HttpServletRequest 的相关 API 获取请求行相关的信息:
("/user/login")
public class UserLoginServlet extends HttpServlet {
protected void doGet(HttpServletRequest req, HttpServletResponse resp) throws ServletException, IOException {
// 获取 request method
String method = req.getMethod();
System.out.println("Request Method: " + method);
// 获取虚拟目录
String contextPath = req.getContextPath();
System.out.println("Context Path: " + contextPath);
// 获取 URL
StringBuffer url = req.getRequestURL();
System.out.println("URL: " + url.toString());
// 获取 URI
String uri = req.getRequestURI();
System.out.println("URI: " + uri);
// 获取请求参数
String queryString = req.getQueryString();
System.out.println("Query String: " + queryString);
}
}
执行请求:
GET http://localhost:8080/web-demo/user/login?name=icexmoon&password=123
输出:
Request Method: GET
Context Path: /web-demo
URL: http://localhost:8080/web-demo/user/login
URI: /web-demo/user/login
Query String: name=icexmoon&password=123
1.2.2.请求头
HTTP 请求报文的头信息格式如下:
Accept-Encoding: gzip, deflate, br
Accept-Language: zh-CN,zh;q=0.9,en;q=0.8,en-GB;q=0.7,en-US;q=0.6
Cache-Control: no-cache
Connection: keep-alive
同样可以用 Servlet 获取并打印头信息:
private void printHeaders(HttpServletRequest req) {
    System.out.println("------------headers------------");
    Enumeration<String> headerNames = req.getHeaderNames();
    while (headerNames.hasMoreElements()) {
        String hn = headerNames.nextElement();
        Enumeration<String> headerValues = req.getHeaders(hn);
        List<String> hvList = new ArrayList<>();
        while (headerValues.hasMoreElements()){
            String hv = headerValues.nextElement();
            hvList.add(hv);
        }
        System.out.println(String.format("%s: %s", hn, String.join(",", hvList)));
    }
}
输出:
------------headers------------
user-agent: PostmanRuntime-ApipostRuntime/1.1.0
cache-control: no-cache
content-type: application/json
accept: */*
accept-encoding: gzip, deflate, br
connection: keep-alive
host: localhost:8080
需要注意的是,HttpServletRequest.getHeader()方法返回的是头信息的第一个值(如果该头信息有多个值的话)。HttpServletRequest.getHeaders()返回的才是指定头信息的所有的值(Enumeration类型的字符串序列)。
1.2.3.请求体
一般用户输入会以表单提交(POST)的方式传输,这些内容实际上是在 HTTP 请求体中的,而非作为 URL 查询参数传输。
此时请求报文头的
Content-Type值是application/x-www-form-urlencoded。
相应的,服务端就需要从请求体中获取用户输入。
这里看一个简单示例,下面是一个用户登录页面:
<html>
<meta charset="UTF-8">
<form action="/web-demo/user/login" method="post">
    用户名:<input type="text" name="username"/><br/>
    密码:<input type="password" name="password"/><br/>
    <input type="submit" value="提交"/>
</form>
</html>
在服务端获取请求报文体中的传参:
@Override
protected void doPost(HttpServletRequest req, HttpServletResponse resp) throws ServletException, IOException {
    // 后去请求的字符输入流
    BufferedReader br = req.getReader();
    // 对输入流逐行打印
    String line;
    do {
        line = br.readLine();
        if (line != null) {
            System.out.println(line);
        }
    }
    while (line != null);
}
输出:
username=sentinel&password=sentinel
这里使用的HttpServletRequest.getReader()方法是以字符流的方式读取请求体。除此之外,HTTP 请求报文还可以传输二进制信息(比如文件上传),此时需要使用字符流的方式读取请求体,对应的是HttpServletRequest.getInputStream()方法。
不需要在 Servlet 处理响应时对打开的请求体输入流执行关闭操作,因为 Web 服务器会在返回报文后自动关闭。
1.2.4.请求参数
就像前边说的,GET 和 POST 在传输参数时有所不同,它们都可以通过 URL 查询参数传输,此外 POST 还可以通过请求体传输。
为了简化对请求参数获取的复杂度,我们可以通过封装好的 API 获取参数,不需要考虑具体传输方式的差异性。
下面用一个简单示例演示。
新建一个提交表单的页面,其中爱好选项为多个复选框:
<html>
<meta charset="UTF-8">
<form action="/web-demo/user/add" method="get">
    用户名:<input type="text" name="username"/><br/>
    爱好:<br/>
    篮球<input type="checkbox" name="hobby" value="basketball"><br/>
    足球<input type="checkbox" name="hobby" value="football"><br/>
    音乐<input type="checkbox" name="hobby" value="music"><br/>
    <input type="submit" value="提交">
</form>
</html>
对应的 Servlet:
@WebServlet("/user/add")
public class UserAddServlet extends HttpServlet {
    @Override
    protected void doGet(HttpServletRequest req, HttpServletResponse resp) throws ServletException, IOException {
        super.doGet(req, resp);
        this.printParams(req);
        this.printFirstVal(req, "hobby");
        this.printAllVals(req, "hobby");
    }

    @Override
    protected void doPost(HttpServletRequest req, HttpServletResponse resp) throws ServletException, IOException {
        super.doPost(req, resp);
        this.printParams(req);
        this.printFirstVal(req, "hobby");
        this.printAllVals(req, "hobby");
    }

    /**
     * 打印所有的请求参数
     * @param req
     */
    private void printParams(HttpServletRequest req) {
        // 打印所有请求参数
        Map<String, String[]> parameterMap = req.getParameterMap();
        parameterMap.forEach((pName, pValues) -> {
            System.out.println(String.format("%s: %s", pName, String.join(",", pValues)));
        });
    }

    /**
     * 打印指定参数的第一个值
     * @param req
     * @param paramName
     */
    private void printFirstVal(HttpServletRequest req, String paramName) {
        String parameter = req.getParameter(paramName);
        System.out.println(String.format("%s's first value is %s", paramName, parameter));
    }

    /**
     * 打印请求参数的所有值
     * @param req
     * @param paramName
     */
    private void printAllVals(HttpServletRequest req, String paramName) {
        String[] values = req.getParameterValues(paramName);
        System.out.println(String.format("%s's all values is %s", paramName, String.join(",", values)));
    }
}
这个 Servlet 中,无论请求是 POST 还是 GET,都用相同的 API 处理传入参数。都是先打印全部参数,再打印某个参数的第一个值,再打印某个参数所有的值。
输出:
username: icexmoon
hobby: basketball,football
hobby's first value is basketball
hobby's all values is basketball,football
可以将表单的提交方式从 GET 修改为 POST,输出内容是一致的。
可以使用 Idea 模板快速创建 Servlet,具体可以观看这个。
1.3.处理中文乱码
1.3.1.POST
添加一个简单的 Servlet:
@WebServlet("/user/edit")
public class UserEditServlet extends HttpServlet {
    @Override
    protected void doGet(HttpServletRequest request, HttpServletResponse response) throws ServletException, IOException {
        String username = request.getParameter("username");
        System.out.println(username);
    }

    @Override
    protected void doPost(HttpServletRequest request, HttpServletResponse response) throws ServletException, IOException {
        String username = request.getParameter("username");
        System.out.println(username);
    }
}
用 POST 的方式传输参数username,内容为魔芋红茶,控制台打印:
éè红è
之前说过,POST 方式传输的参数是通过报文体传输的,在服务端是由 Servlet 以输入流的方式打开并读取的。本质上传输的时候都是以二进制方式传输的,以输入流方式读取为字符,就要指定编码。Servlet 默认是以 ISO-8859-1 的编码方式将二进制输入流转换为字符流。而浏览器端是用 UTF-8 编码,因此会出现乱码。
因此只要让 Servlet 使用 UTF-8 编码的方式打开输入流就行了:
@Override
protected void doPost(HttpServletRequest request, HttpServletResponse response) throws ServletException, IOException {
    request.setCharacterEncoding(StandardCharsets.UTF_8.name());
    String username = request.getParameter("username");
    System.out.println(username);
}
控制台打印:
魔芋红茶
1.3.2.GET
GET 方式传输的参数是以 URL 查询字符串方式传输的。与报文体不同的是,HTTP 协议规定 URL 只能使用 ASCII 字符集。为了满足要求,浏览器会先获取查询参数的字节码(二进制),然后用 urlencode 的方式对其进行编码。
urlencode 可以将一个8位二进制用2位16进制表示,并在前边加一个%符号。
这个过程可以用一个示例说明:
@Test
public void testUrlEncode() throws UnsupportedEncodingException {
    String msg = "魔芋红茶";
    byte[] bytes = msg.getBytes(StandardCharsets.UTF_8);
    // 以二进制的方式打印字节数组
    for (byte b: bytes){
        System.out.print(Integer.toBinaryString(b & 0xFF)); //打印二进制字符串
        System.out.print(" ");
    }
    System.out.println();
    String encode = URLEncoder.encode(msg, StandardCharsets.UTF_8.name());
    System.out.println(encode);
}
结果:
11101001 10101101 10010100 11101000 10001010 10001011 11100111 10111010 10100010 11101000 10001100 10110110
%E9%AD%94%E8%8A%8B%E7%BA%A2%E8%8C%B6
计算一下可知,11101001用十六进制表示就是E9,10101101用十六进制表示就是AD。
Windows 计算器的程序员模式可以进行二进制转换计算。
urlencode 编码是兼容 ASCII 字符集的,ASCII 字符集的字符看起来就好像没有编码一样。
自然的,在服务端会进行 urldecode 解码,出问题的地方在于 Servlet 会将 url 编码后的字符串以 ISO-8859-1 字符集的方式进行解码。
可以用一个示例证明这一点:
@Test
public void test88591() {
    String msg = "魔芋红茶";
    // 获取 UTF-8 编码后的字节数组
    byte[] bytes = msg.getBytes(StandardCharsets.UTF_8);
    // 将字节数组以 ISO-8859-1 的方式解码
    String decode = new String(bytes, StandardCharsets.ISO_8859_1);
    System.out.println(decode);
}
输出:
éè红è
乱码的内容与之前一致。
最简单的方式是让 Servlet 用 UTF-8 字符集进行 urldecode,但 Servlet 并没有类似的 API 提供,无法修改。
这里再分析一下出错的步骤:
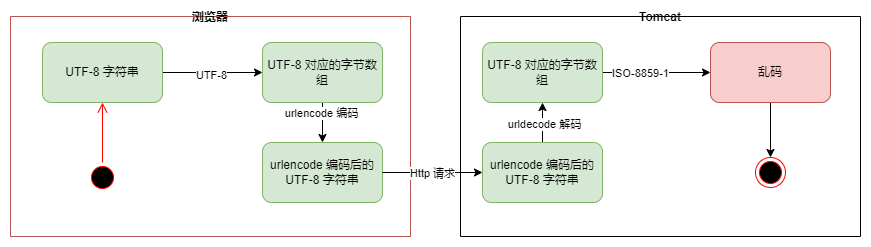
具体传输的时候整个报文是以二进制方式传输的,这本身不属于 HTTP 协议,是 TCP/IP 协议。HTTP 协议本身是一个使用 ASCII 字符集定义的协议。
出错的地方在服务端的 UTF-8 字节数组转换为 字符串这一步,错误的使用了 ISO-8859-1 字符集。也就是说,我们可以将 ISO-8859-1 解码出的乱码用同样的字符集编码回原始的 UTF-8 字节数组,然后再用 UTF-8 解码即可得到正确的字符串:
@Override
protected void doGet(HttpServletRequest request, HttpServletResponse response) throws ServletException, IOException {
    String username = request.getParameter("username");
    // 获取 ISO-8859-1 的原始字节数组
    byte[] bytes = username.getBytes(StandardCharsets.ISO_8859_1);
    // 对原始数组使用 UTF-8 字符集解码
    username = new String(bytes, StandardCharsets.UTF_8);
    System.out.println(username);
}
实际上 POST 产生的乱码也可以用类似的方式处理。
Tomcat 从 8.0 版本开始,默认使用 UTF-8 处理请求报文,因此不会产生乱码问题。
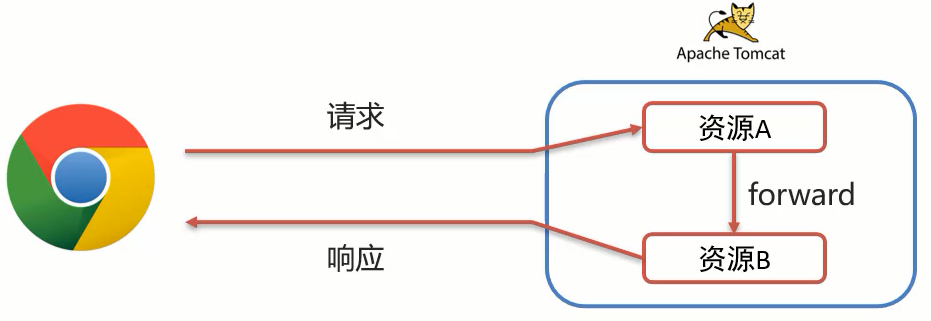
1.4.请求转发
Servlet 在处理请求的时候可以将这个请求进行转发,将由另一个 Servlet 接收并继续处理。
这个过程可以用下面的图表示:
添加两个 Servlet:
@WebServlet("/forward/a")
public class AServlet extends HttpServlet {
    @Override
    protected void doGet(HttpServletRequest request, HttpServletResponse response) throws ServletException, IOException {
        System.out.println("A servlet handling ...");
        RequestDispatcher requestDispatcher = request.getRequestDispatcher("/forward/b");
        requestDispatcher.forward(request, response);
    }
	// ...
    }
}

@WebServlet("/forward/b")
public class BServlet extends HttpServlet {
    @Override
    protected void doGet(HttpServletRequest request, HttpServletResponse response) throws ServletException, IOException {
        System.out.println("B servlet handling ...");
    }
	// ...
}
AServlet 中通过HttpServletRequest.getRequestDispatcher()方法获取了一个RequestDispatcher,然后调用RequestDispatcher.forward()将后续处理转发给BServlet。
请求 http://localhost:8080/web-demo/forward/a 可以看到如下输出:
A servlet handling ...
B servlet handling ...
转发请求的时候往往需要传递一些信息,比如处理了一半需要继续处理的数据等。这些数据可以作为属性(Attribute)保存在HttpServletRequest对象中。
操作属性的 API 方法有:
-
void setAttribute(String name,Object o),设置属性 -
Object getAttribute(String name),获取属性 -
void removeAttribute(String name),删除属性
修改之前的示例,在 A 在转发请求的时候附带一个当前时间,B 收到请求后获取 A 传递的时间信息,并打印:
@WebServlet("/forward/a")
public class AServlet extends HttpServlet {
    @Override
    protected void doGet(HttpServletRequest request, HttpServletResponse response) throws ServletException, IOException {
        System.out.println("A servlet handling ...");
        RequestDispatcher requestDispatcher = request.getRequestDispatcher("/forward/b");
        request.setAttribute("time", LocalDateTime.now());
        requestDispatcher.forward(request, response);
    }
    // ...
}

@WebServlet("/forward/b")
public class BServlet extends HttpServlet {
    @Override
    protected void doGet(HttpServletRequest request, HttpServletResponse response) throws ServletException, IOException {
        System.out.println("B servlet handling ...");
        Object time = request.getAttribute("time");
        if (time instanceof LocalDateTime) {
            LocalDateTime datetime = (LocalDateTime) time;
            System.out.println("time: "+datetime.format(DateTimeFormatter.ISO_DATE_TIME));
        }
    }
	// ...
}
2.Response
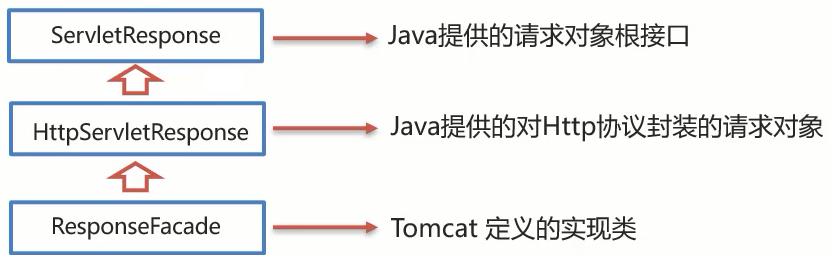
2.1.继承体系
2.2.案例:重定向
要让浏览器进行页面重定向,根据 HTTP 协议,只要让返回报文的响应码为 302,且在响应头中提供一个location: xxx就可以实现。
这里是一个重定向的简单示例:
@WebServlet("/redirect/a")
public class AServlet extends HttpServlet {
    @Override
    protected void doGet(HttpServletRequest request, HttpServletResponse response) throws ServletException, IOException {
        System.out.println("A servlet is handling ...");
        response.setStatus(302);
        String contextPath = request.getContextPath();
        response.setHeader("location", contextPath + "/redirect/b");
    }
    // ...
}
@WebServlet("/redirect/b")
public class BServlet extends HttpServlet {
    @Override
    protected void doGet(HttpServletRequest request, HttpServletResponse response) throws ServletException, IOException {
        System.out.println("B servlet is handling ...");
    }
	// ...
}
在设置转发地址(
location: xxx)的时候需要包含虚拟路径(如果有的话),最好不要将虚拟路径硬编码,比如/web-demo/redirect/b,而是动态获取(通过getContextPath()方法),这样即使修改了 Tomcat 的虚拟路径设置,程序依然是有效的。
在上面这个示例中,请求 http://localhost:8080/web-demo/redirect/a 会触发页面重定向,浏览器会重新定位到 http://localhost:8080/web-demo/redirect/b 这个页面。
页面重定向除了上面的方式,HttpServletResponse还有一个更简便一点的方法:
response.sendRedirect(contextPath + "/redirect/b");
效果和实现原理都是相同的。
2.3.响应数据
与请求体类似,向响应体写数据是以输出流的方式操作的,同样有字节流和字符流两种方式。
2.3.1.字符流
最常见的是返回 Html 内容:
@WebServlet("/response/html")
public class HtmlServlet extends HttpServlet {
    @Override
    protected void doGet(HttpServletRequest request, HttpServletResponse response) throws ServletException, IOException {
        response.setHeader("Content-Type", "text/html;charset=UTF-8");
        PrintWriter writer = response.getWriter();
        writer.print("<html><h1>Hello World!</h1></html>");
    }
    // ...
}
和处理请求体时使用输入流类似,这里也不需要对输出流进行刷新和关闭操作,这些操作会在 Response 对象销毁时被 Web 服务器调用。
要让浏览器能够正常处理(解析)返回的响应体内容,需要告诉浏览器响应信息的类型(Content Type),这是通过响应报文的Content-Type头信息实现的。
通常,返回 HTML 内容时,需要设置头信息:Content-Type: text/html; charset=UTF-8。
如果忘了该头信息的内容,可以随便找一个 HTML 页面请求后用浏览器开发者工具查看:

实际上 text/html 是一种 ,该类型涵盖了所有的可以在互联网上传播的文件格式(因此数量庞大)。
常见的有:
-
text/html,HTML 文档
-
application/vnd.ms-excel,EXCEL 文档
-
application/json,JSON 字符串
-
application/msword,Word 文档
-
application/zip,zip 压缩文件
2.3.2.字节流
可以通过字节流将二进制文件写入响应报文体并发送给浏览器。
看一个简单示例:
@WebServlet("/response/file")
public class FileServlet extends HttpServlet {
    @Override
    protected void doGet(HttpServletRequest request, HttpServletResponse response) throws ServletException, IOException {
        // 设置报文头
        response.setHeader("Content-Type","image/png");
        // 读取一个本地文件
        File file = new File("D:/image/Screenshots/屏幕截图(27).png");
        InputStream inputStream = new FileInputStream(file);
        ServletOutputStream outputStream = response.getOutputStream();
        // 设立字节缓冲区
        final int CACHE_SIZE = 255;
        byte[] bytes = new byte[CACHE_SIZE];
        do {
            // 将目标文件字节读取到缓冲区
            int readNum = inputStream.read(bytes);
            if (readNum <= 0) {
                // 抵达文件末尾或者没有内容可读取
                break;
            }
            // 将缓冲区内容写入响应报文体
            outputStream.write(bytes, 0, readNum);
        }
        while (true);
        inputStream.close();
    }
}
这里是将一张本地图片发送给浏览器,请求 http://localhost:8080/web-demo/response/file 就能看到效果。
具体浏览器如何处理文件取决于浏览器自己的实现方式。
在上边这个例子中,是手写了一段输入流到输出流的字节拷贝代码,有一些工具可以帮助我们完成这一工作。
添加依赖:
<dependency>
    <groupId>commons-io</groupId>
    <artifactId>commons-io</artifactId>
    <version>2.6</version>
</dependency>
示例代码可以改写为:
@Override
protected void doGet(HttpServletRequest request, HttpServletResponse response) throws ServletException, IOException {
    // 设置报文头
    response.setHeader("Content-Type","image/png");
    // 读取一个本地文件
    File file = new File("D:/image/Screenshots/屏幕截图(27).png");
    InputStream inputStream = new FileInputStream(file);
    ServletOutputStream outputStream = response.getOutputStream();
    IOUtils.copy(inputStream, outputStream);
    inputStream.close();
}
3.案例:用户登录
创建一个 Maven Web 项目,持久层使用 MyBatis+MySQL,并添加相关的持久层和页面资源。
这里我整合好了一个这样的示例项目 ,数据库 SQL 文件也包含在内。
添加登录接口:
@WebServlet("/user/login")
public class UserLoginController extends HttpServlet {
    private UserService userService = new UserServiceImpl();

    @Override
    protected void doPost(HttpServletRequest req, HttpServletResponse resp) throws ServletException, IOException {
        String username = req.getParameter("username");
        String password = req.getParameter("password");
        resp.setHeader("Content-Type", "text/html;charset=utf-8");
        PrintWriter writer = resp.getWriter();
        String htmlTemplate = "<html><h1>%s</h1></html>";
        try {
            ControllerUtil.checkParamNotEmpty(username);
            ControllerUtil.checkParamNotEmpty(password);
            userService.checkLogin(username, password);
            writer.println(String.format(htmlTemplate, "登录成功!"));
        } catch (Exception e) {
            // 登录失败
            e.printStackTrace();
            writer.println(String.format(htmlTemplate, "登录失败:" + e.getMessage()));
        }
    }
}
修改 login.html,让表单提交到登录接口:
<div id="loginDiv">
    <form action="/login-demo/user/login" id="form" method="post">
        <!-- ... -->
    </form>
</div>
用类似的方式实现用户注册,这里不做赘述,可以查看。
本文的完整示例可以从获取。


文章评论