图源:
文件上传是Web应用相当常见的功能,本篇文章将展示如何在Spring Boot的项目中添加此功能。
假设我们需要在编辑图书时为图书上传一个封面。
依赖
先添加需要的依赖:
        <dependency>
            <groupId>javax.activation</groupId>
            <artifactId>activation</artifactId>
            <version>1.1.1</version>
        </dependency>
        <dependency>
            <groupId>org.apache.directory.studio</groupId>
            <artifactId>org.apache.commons.codec</artifactId>
            <version>1.8</version>
        </dependency>
配置
再添加需要的配置:
#默认应用运行加载的配置文件
spring.profiles.active=dev
#文件上传目录
books.file.upload.path=D:/workspace/learn_spring_boot/ch14/upload/
#应用使用的域名
books.web.host=localhost
#应用监听端口
server.port=8080
这里项目自定义配置都使用books.xxx方式命名,当然为避免重复更好的方式是用自己的域名命名。
工具类
为了更方便使用配置项,这里引入一个工具类:
public class SysProperties {
("${server.port}")
private String port;
("${books.web.host}")
private String host;
("${books.file.upload.path}")
private String uploadPath;
("${spring.profiles.active}")
private String evn;
}
@Value注解的用途是将配置中的指定配置项的值绑定到其所在的属性上。举例说明,这里的port因为@Value注解的关系,其值就是配置项server.port的值,也就是8080。
@Value中value属性定义的语法也很简单,类似PHP或Bash中在字符串中使用变量的语法:${xxx}。
为了给上传功能增加限制,只允许上传照片,这里引入一个文件相关的工具类:
public class MyFileUtil {
private MimetypesFileTypeMap mtftp;
public MyFileUtil() {
mtftp = new MimetypesFileTypeMap();
/* 不添加下面的类型会造成误判 详见:http://stackoverflow.com/questions/4855627/java-mimetypesfiletypemap-always-returning-application-octet-stream-on-android-e*/
mtftp.addMimeTypes("image png tif jpg jpeg bmp");
}
public boolean isImage(File file) {
//检查后缀名是否是图片
String mimetype = mtftp.getContentType(file);
String type = mimetype.split("/")[0];
if (!type.equals("image")) {
return false;
}
//检查文件内容是否为图片(能否正常获取到高和宽)
try {
BufferedImage bufferedImage = ImageIO.read(file);
if (bufferedImage == null) {
return false;
}
bufferedImage.getHeight();
bufferedImage.getWidth();
} catch (IOException e) {
e.printStackTrace();
return false;
}
return true;
}
/**
* 获取文件后缀名
*
* @param fileName
* @return
*/
public String getFileSuffix(String fileName) {
if (fileName == null || fileName.isEmpty()) {
return "";
}
int potIndex = fileName.lastIndexOf('.');
if (potIndex < 0) {
return "";
}
if (fileName.length() <= potIndex + 1) {
return "";
}
String suffix = fileName.substring(potIndex + 1);
return suffix;
}
}
isImage方法会先检查文件后缀名是否是图片,再尝试将文件作为图片对象读取,并获取宽和高,如果读取失败就认为不是图片。
类似的,再引入一个处理字符串的工具类:
public class MyStringUtil {
/**
* 将数据进行 MD5 加密,并以16进制字符串格式输出
*
* @param data
* @return
*/
public static String md5(String data) {
try {
MessageDigest md = MessageDigest.getInstance("MD5");
return Hex.encodeHexString(md.digest(data.getBytes(StandardCharsets.UTF_8)));
} catch (NoSuchAlgorithmException e) {
e.printStackTrace();
throw new ResultException(Result.ErrorCode.DEFAULT_ERROR, "缺少md5编译器");
}
}
/**
* 将给定字符串首字母大写并返回
*
* @param words 字符串
* @return 首字母大写的字符串
*/
public static String upperFirst(String words) {
if (words == null || words.isEmpty()) {
return words;
}
String newWords = words.substring(0, 1).toUpperCase() + words.substring(1);
return newWords;
}
/**
* 将给定字符串首字母小写并返回
*
* @param words 字符串
* @return 首字母小写的字符串
*/
public static String lowerFirst(String words) {
if (words == null || words.isEmpty()) {
return words;
}
String newWords = words.substring(0, 1).toLowerCase() + words.substring(1);
return newWords;
}
/**
* 将一个字符串从中编码转换为另一种编码
*
* @param source 要转换的字符串
* @param sourceEncoding 原始编码
* @param targetEncoding 要转换成的目标编码
* @return
*/
public static String convert2OtherEncoding(String source, String sourceEncoding, String targetEncoding) {
try {
return new String(source.getBytes(sourceEncoding), targetEncoding);
} catch (UnsupportedEncodingException e) {
e.printStackTrace();
throw new ResultException(Result.ErrorCode.DEFAULT_ERROR, "转码错误");
}
}
public static String md5(String source, String salt) {
Md5Hash md5Hash = new Md5Hash(source, salt);
return md5Hash.toString();
}
/**
* 生成指定长度的随机串
*
* @param source 字符字典
* @param length 长度
* @return
*/
public static String genRandomCode(String source, int length) {
StringBuffer code = new StringBuffer();
Random random = new Random();
for (int i = 0; i < length; i++) {
code.append(source.charAt(random.nextInt(source.length())));
}
return code.toString();
}
/**
* 生成指定长度的随机穿(数字和字母组成)
*
* @param length
* @return
*/
public static String genRandomCode(int length) {
final String source = "0123456789QWERTYUIOPASDFGHJKLZXCVBNMabcdefghijklmnopqrstuvwxyz";
return genRandomCode(source, length);
}
}
上传文件
现在添加上传文件的代码:
(tags = "文件上传")
("/common/file")
public class FileController {
private MyFileUtil myFileUtil;
private SysProperties sysProperties;
(description = "上传文件成功后返回的VO")
private static class FileUploadVO implements IResult {
String url;
}
(value = "文件上传")
(value = "/upload")
public FileUploadVO fileUpload(
MultipartFile file) {
if (file == null) {
throw new ResultException(Result.ErrorCode.PARAM_CHECK, "没有文件需要上传");
}
try {
//使用文件名+时间戳作为新的文件名进行保存
String originalFileName = file.getOriginalFilename();
String fileEnd = myFileUtil.getFileSuffix(originalFileName);
if (fileEnd.isEmpty()) {
throw new ResultException(Result.ErrorCode.PARAM_CHECK, "文件缺少后缀名");
}
String newFileName = System.currentTimeMillis() + MyStringUtil.genRandomCode(5) + '.' + fileEnd;
String filePath = sysProperties.getUploadPath();
String pathstr = filePath + newFileName;
//使用临时文件保存上传的文件内容
File tempFile = new File(System.getProperty("java.io.tmpdir"), newFileName);
file.transferTo(tempFile);
try {
if (!myFileUtil.isImage(tempFile)) {
throw new ResultException(Result.ErrorCode.PARAM_CHECK, "只能上传图片");
} else {
FileCopyUtils.copy(new FileInputStream(tempFile), Files.newOutputStream(Paths.get(pathstr), StandardOpenOption.CREATE_NEW));
}
} finally {
//删除临时文件
tempFile.delete();
}
FileUploadVO vo = new FileUploadVO();
String port = sysProperties.getPort();
String host = sysProperties.getHost();
if (sysProperties.getEvn().equals("prd")) {
//生产环境有代理,不需要指定端口
vo.setUrl(String.format("http://%s/image/%s", host, newFileName));
} else {
vo.setUrl(String.format("http://%s:%s/image/%s", host, port, newFileName));
}
return vo;
} catch (IOException | SecurityException e) {
throw new ResultException(Result.ErrorCode.DEFAULT_ERROR, "文件上传出错");
}
}
}
这里返回的上传后的文件路径是http://%s:%s/image/%s的形式,而实际上我们定义的文件上传目录是项目根目录下的/upload目录。之所以不能直接返回http://%s:%s/upload/%s形式的url,是因为实际上Spring Boot项目部署的时候实际上是整个打成一个Jar包存在的,要想通过http请求访问Spring Boot应用的静态资源或者其他目录下的静态资源,就需要在网站配置中添加路径映射关系:
public class MyWebAppConfigurer extends WebMvcConfigurationSupport {
private SysProperties sysProperties;
protected void configureMessageConverters(List<HttpMessageConverter<?>> converters) {
// TODO Auto-generated method stub
super.configureMessageConverters(converters);
converters.add(responseBodyConverter());
}
public HttpMessageConverter responseBodyConverter() {
StringHttpMessageConverter converter = new StringHttpMessageConverter(Charset.forName("UTF-8"));
return converter;
}
// 如果不加,则静态资源会被拦截,导致访问不到静态资源
protected void addResourceHandlers(ResourceHandlerRegistry registry){
registry.addResourceHandler("/**")
.addResourceLocations("classpath:/META-INF/resources/")
.addResourceLocations("classpath:/resources/")
.addResourceLocations("classpath:/static/")
.addResourceLocations("classpath:/public/");
registry.addResourceHandler("/swagger-ui/**")
.addResourceLocations("classpath:/META-INF/resources/webjars/springfox-swagger-ui/");
registry.addResourceHandler("/image/**")
.addResourceLocations("file:"+sysProperties.getUploadPath());
super.addResourceHandlers(registry);
}
//对返回值使用jackson进行转换
(required = false)
private MappingJackson2HttpMessageConverter mappingJackson2HttpMessageConverter;
protected void extendMessageConverters(List<HttpMessageConverter<?>> converters) {
converters.removeIf(converter -> converter instanceof MappingJackson2HttpMessageConverter);
if (Objects.isNull(mappingJackson2HttpMessageConverter)) {
converters.add(0, new MappingJackson2HttpMessageConverter());
} else {
converters.add(0, mappingJackson2HttpMessageConverter);
}
}
public CorsFilter corsFilter() {
// 创建 CorsConfiguration 对象
CorsConfiguration config = new CorsConfiguration();
config.setAllowCredentials(true);
config.addAllowedOriginPattern("*"); // 设置访问源地址
config.addAllowedHeader("*"); // 设置访问源请求头
config.addAllowedMethod("*"); // 设置访问源请求方法
// 创建 UrlBasedCorsConfigurationSource 对象
UrlBasedCorsConfigurationSource source = new UrlBasedCorsConfigurationSource();
source.registerCorsConfiguration("/**", config); // 对接口配置跨域设置
return new CorsFilter(source);
}
}
测试
现在用调试工具模拟文件上传:
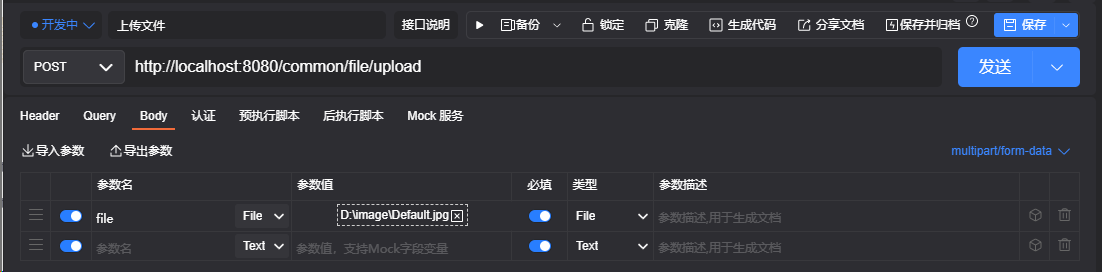
要注意,参数是
file,类型是File。
此时调用会出现以下报错信息:
{
    "timestamp": "2022-08-03T01:49:55.488+00:00",
    "status": 500,
    "error": "Internal Server Error",
    "trace": "org.springframework.web.multipart.MaxUploadSizeExceededException: Maximum upload size exceeded; nested exception is java.lang..."
}
这是因为没有设置上传文件允许的最大值,需要添加配置:
#单个文件上传大小限制
spring.servlet.multipart.max-file-size=10MB
##一次请求上传文件总大小限制
spring.servlet.multipart.max-request-size=10MB
现在再尝试上传图片,就能看到以下返回信息:
{
    "success": true,
    "msg": "",
    "data": {
        "url": "http://localhost:8080/image/1659492058001MQAZT.jpg"
    },
    "code": "200"
}
关于文件上传的介绍就到这里了,谢谢阅读。


文章评论